Make Application complete guide,Putting it all together,Basic application,Total Transformations,Models need makeup too
Putting it all together

Basic application

Girls just want to have fun — especially when it comes to makeup. So get ready to play with color! In this chapter, we’ll paint on the perfect eye look, learn the tricks of applying blush and bronzers, make lips speak volumes with luscious color, and even experiment with false eyelashes. Get ready to reveal the real you!

sunni smyth
Brows
When selecting a brow color, choose one that is either your natural color or one shade lighter. Be careful not to confuse brow pencils and powders with eye pencils and shadows—they are not the same.Brow pencils are duller in color, usually with no sheen, and have a somewhat waxier texture than eyeliner pencils do. Eyebrow powder is duller and more matte than eyeshadow.
When using a brow pencil, apply short, feathery, hairlike strokes angled in the same direction as the hairs’ growth. Never draw on a solid, hard-looking line. Short feather-like strokes are meant to imitate short brow hairs. I like to go over the area again, using a small angled brush, following the same stroke pattern. It blends the pencil in a little better and helps it appear more natural.
You can also achieve a very natural brow by using brow powder. Apply it with a small, stiff, angled brush in short, feathery strokes, while following the natural hair growth pattern.
For those with scars or brows that are just not there, you may need the coverage of a crème brow color, which gives the most coverage. Simply apply it with a stiff, angled brush using short feathery strokes. It’s always best to follow crème with a brow powder to set it and help it last all day.
Whichever method you prefer, when grooming your brows, always finish by using a brow brush to brush upward and outward. If you like, you can end with a brow gel. It acts like hairspray for the brows. To review how to create the best shape for your brows, turn to page
Tips:
Sharpen your pencil each time you use it. The sharper the pencil, the better the application.
You can use eyebrow pencil or eyebrow powder separately, or you can combine them. If you combine them, you’ll increase their wearing time.

Eyes
Three times is definitely a charm when it comes to applying eye color. It takes three shades to shape the eye: a highlight, midtone, and contour shade. The basic rule to remember is that everything you highlight will come toward you or become more prominent, and everything you contour or darken will recede or move away from you. Using three shades creates a subtle visual trick to help bring out one of your most beautiful features and help draw attention to your eyes rather than your eyelids. While there are thousands of shades to choose from, everyone should use the three-shade application technique for best results. Be sure to review pages to identify your particular eye shape and learn the correct placement for your three shades.
HIGHLIGHT
Your highlight shade is the lightest of the three eyeshadows. It can be more or less dramatic, depending on the shade and the finish you select. A matte finish will give you a more subtle look than a shimmer finish. The shimmer will be more dramatic. For example, I usually use a shimmer highlight on deep-set eyes because it opens up the eye more than a matte shade. Also, the lighter the highlight shade, the more dramatic your look. A softer or flesh-toned shade will give you a less dramatic look. You should apply the highlight shade to your browbone and eyelid.

MIDTONE
Your midtone shade is your most important shade. It’s the first step in the blending process and in creating the crease of the eye. This shade should be the most subtle—an extension of your skin. You’ll change your highlight and contour colors more often than your midtone shade. Most of the time it is best for your midtone color to have a matte finish, but it does not always have to. It is just that the matte finish gives it a more subtle and natural appearance.To apply it, start from the outside corner of the eyelid, so that area will get the most midtone color. Gently move your brush across the crease into the inside corner of the eyelid. Depending on your eye shape (if yours is any other shape than basic), you may not always want to bring the color all the way over to the inside corner. Refer to pages for exact placement. If you want a very defined crease, you can apply a few more layers of your midtone shade, always making sure to blend it where it meets the highlight shade.
If you’re short on time, just sweep your midtone color across your eyelids for a very natural look. It will help your eye color “pop,” but won’t help to define or shape your eyelids.
CONTOUR
The contour shade is the deepest of the three shades. It’s not necessarily stark or dark—it can even be metallic—but it is the eyeshadow that is the deepest of the three. The contour eyeshadow is the shade you can have fun with and change with your mood. You’ll find that most makeup lines offer more contour colors, because they are the most eye-catching and exciting to use.
To apply, take a brush with shadow and move it across your top lash line from the outside corner inward. Then bring the color up into the outer portion of the crease and blend it inward. This layers the contour shade on top of your midtone shade to help you get the blended, defined look you want. You can also apply the contour color underneath the lower lash line to define or blend it over your eye pencil.
For a more dramatic eye, you can always apply several layers of color to build the shade’s intensity. Add color in small amounts. You can always add more for extra drama, but once you’ve applied it, it’s difficult to remove. You can also create a “smoky” eye using your contour color over the entire lid, beginning at the lash line and blending it as you go upwards. For a true smoky look, you must blend, blend, and blend some more, otherwise your eyeshadow will appear too harsh.


amy williams
EYELINER

You can line and define your eyes in a number of ways: with pencil, liquid, cake, crème, or powder. Or you can skip this step completely! It’s a matter of personal choice.
Pencil eyeliners contain silicone to help the color glide on smoothly and blend easily. Make sure the pencil you use doesn’t have too much silicone, or the color will smear and smudge underneath your eyes rather than define them.
To apply pencil liner, begin at the outside corner of your eye and draw small, feather-like strokes, connecting each one as you move toward the inside of the eye. Then blend with a small brush. Using the same brush, apply a powder shadow in a similar color over the pencil to help make it look more natural. I always do this because it softens the pencil line and sets the color. It also helps you correct any mistakes you may have made when blending the pencil strokes together.
For nighttime drama, I like to use a pencil underneath the eye and along the upper lash line. Along the upper lashline, make sure the line gradually grows thicker as it extends toward the outer corner of the eyes. Underneath the eye, you want the color to be the most intense at the outer corner and slowly fading as it reaches the inner corner. Drawing the same thickness all the way across and underneath the eyelids can close in the eyes and make them appear smaller. For daytime, I normally don’t use pencil underneath the eye. Instead, I like to use an eyeshadow and a brush to create a softer, more natural look. If you prefer to wear pencil during the daytime, be sure to soften it by applying powder over it to make it appear more subtle.
Some women have a more noticeable rim of skin that is visible between the lashes and the eye, depending on their eye shape. You can darken this area with a pencil or a dark shadow to help your eye color “pop.” One of my favorite tricks is to take black eyeshadow and carefully push it into the base of the lashes using a fine-tipped brush. This defines the eyes and makes the lashes look thicker without making your eyes appear “lined.”
Tips:
You could also use a blush for your midtone if the product has been approved for the eye.
A quick note: The first place you put your brush will receive the most color, because it has the most eyeshadow on it at that point.
Since blending is so vital to the overall effect of beautifully painted eyes, good-quality shadow brushes are a must, because they enable you to create artful shapes and effects.
You should apply concealer and powder to your lids first before applying eyeshadow. This helps the color blend more easily and wear longer.
Always keep your pencils sharpened for more precise application.
Liquid eyeliner is the longest-wearing, and most brands come with a fine- tipped application brush. Liquid liner creates the strongest, most dramatic line. Never use liquid liner under the eye, because it leaves an unnatural line that can be stark and hard-looking.
When using liquid eyeliner on the top of your eyelid, draw a continuous line starting at the inside corner to the outside corner of the eye, giving the line a little “kick” upwards at the end. Make sure it is the most narrow at the inside corner, gradually getting thicker as you get to the outside corner. Liquid eyeliner is the most difficult to apply, but you can master it with a little practice.
Crème eyeliner is also applied with a damp brush in the same manner as liquid and cake.
Cake eyeliner comes as a powder. To apply, first dampen your brush, then swipe it across the powder to form a liquid. Then apply it just as you would liquid eyeliner.
Powder eyeliner, or eyeshadow used as liner, gives the most natural look and is the easiest to work with. You can use it dry, or use it wet if you want a stronger look. To apply it dry, use a brush and draw a fine line along the base of the lashes from the outside to the inside corner of the eye. If you’d like to apply the powder wet, dampen your brush and apply it like liquid eyeliner. Powder used wet gives the same effect as liquid, but is much easier to control.
jennifer stephens
Long Lashes

I always recommend curling your eyelashes, because it opens up the eyes and makes them appear larger and more youthful. Many women skip this step and it’s a mistake. You’re never too old to curl your lashes. But make sure the tool you use is young. If you use an eyelash curler for more than a year, it can get out of alignment and cut your lashes.
The trick to curling your eyelashes correctly is to crimp them more than just once at the lash line. Instead, “walk” the eyelash curler up the length of your lashes, taking care to close, open and move the eyelash curler up several times until you reach the end of your lashes. This method creates a curve rather than a crimp, and will help your eyelashes stay curled.
You can make your lashes look longer or thicker by applying your mascara correctly. Thickening and lengthening mascaras contain particles that attach to the lash so you can control how you want to build your lashes.
For thicker lashes: Start at the base of the lashes and hold your mascara wand in a horizontal position, working it from side to side as you work your way up to the end of the lashes. This makes the mascara particles attach to the sides of your lashes, making them appear thicker.
For longer lashes: Hold your mascara wand in a vertical position. Starting at the base of the lash line, pull the wand up and out to the end of your lashes. The particles will attach to the ends of your lashes, making them appear longer.
Make sure you choose the correct formula for your desired effect. If you want to define your lashes, use a defining formula. If you want to thicken, use a thickening formula. Turn to page for more information on the different mascara formulas that are available.


False eyelashes
If you want more drama, you can always wear false eyelashes. They come in strips, individual flares, and individual strands.
If you’d like that flirtatious, “frankly fake” look for evening, use the strips, because they are the most noticeable.
It’s best to apply a pencil eyeliner before your strip eyelashes so you can see exactly where to place them, and to prevent any skin from showing between your natural lashes and the false ones. The closer you place them to your natural lashline, the more natural they’ll appear. You can follow with a liquid liner to help disguise the lash band.
The flares are more natural-looking than strips, but my preference is for the individual-strand lashes. They look the most natural, and they are the ones typically used for most mascara advertisements. You simply apply them directly on top of your own lashes to help extend the length.
Tips:
I personally prefer to use black mascara on the upper lashes and brown on the lower ones, because brown looks less harsh.
Make certain you coat your lashes with mascara at the inside corners and the very outer corners. These are the two areas that many women miss.
Two or three thinly applied coats of mascara are far more effective than a single clumpy one.
Cheek Chic
Blush and bronzer work together to bring your face alive and give you a natural, healthy glow. Getting that beautiful glow is a two-step process, because I always like to bronze the face before adding the actual cheek color. I think every woman can benefit from bronzing because it adds warmth and natural beauty to the skin and can make you appear younger.Before we learn how to bronze and blush correctly, I want to shatter the old myths of where and how to apply color to your cheeks.
Myth 1: Blush should never be worn closer to your nose than the width of two fingers. Depending on the width of your fingers, your blush could wind up on the side of your face instead of the apples of your cheeks!
Myth 2: Blush should never be applied below the tip of your nose. If you followed this advice and you have a cute little turned-up nose, your blush could be applied above the apples of your cheeks.
Myth 3: Apply blush as an inverted triangle to the face to give it more shape. We use foundation and powder to highlight and contour the face—not blush. Blush is used to add color and life to the skin.
Myth 4: Mature women should apply cheek color higher as they age. While the skin may lose some of its elasticity as we age, I can assure you that our cheekbones remain in the same place! If you know how to locate your cheekbones correctly, you’ll always have your bronzer and blush in the right place on your face.
To accurately locate your cheekbones, take this can’t-miss application test:
- Smile.
- Locate the center of the “apple” of your cheek and place your index finger there. Next, place your thumb at the top of your ear where it connects to your head. Now take your thumb and bring it toward your index finger. The bone you feel is your cheekbone. Finally, apply your color directly onto the cheekbone.
Tip:
Keep separate brushes for bronzers and blush, because it keeps each color clearer and purer.


BRONZER
Bronzer makes your skin look sun-kissed and alive. It gives your skin a healthy glow without subjecting it to damaging ultraviolet rays. To warm your face and accentuate your bone structure, simply dust bronzing powder or crème bronzer along the outer edges of your face and onto your cheekbones. Bronzer is also useful for lightly sculpting the nose and chin. See page for more info on sculpting.Always apply your bronzer beginning at the back of your cheekbone and sweep it forward. Then go back and brush in the opposite direction to blend. If you are using a crème bronzer, simply dot the color along your cheekbone and blend. Don’t forget a little at the temples to help shape your face. Sweeping the bronzing powder up around the temples and eye sockets can also really help your eye color pop, especially if your eyes are green or blue.
If bronzing powders and crèmes look too bold on you, try using pressed powder instead. It has a lower pigment level and blends very nicely. If you have lighter skin, an ebony pressed powder will work beautifully as a bronzer.

BLUSH
There are three major mistakes women make with blush:- Using too much of it in the fall and winter to try to compensate for the lack of a tan.
- Choosing a color that is either too red or too purple. Remember, to help determine a good shade for yourself, try a short burst of energetic exercise, then match your blush color to your cheeks’ natural flush.
- Applying too little of a shade because it’s too strong. If you don’t apply enough, it won’t last through the day.
The intensity of color you are wearing on your eyes and lips can determine the amount of blush you might need that day. For example, if you are wearing a strong lip color, you will need less blush. If you are wearing a paler, sheerer lip color, you might need more blush.
A powder blush is the easiest to use. There are two ways to apply your powder blush properly:
- Apply blush to your cheekbone area, starting at the back (closest to your ear). Sweep your cheek color toward the apple of your cheek, then back toward the ear again. Then go back again in the opposite direction to blend. This way, your most intense color lies at the back of your cheek and gives your face more dimension.
- For a more natural appearance, you can try a technique called “popping your apples.” First, apply bronzer to your cheekbones. Then take a light, sheer blush color, making sure it is not too dark. Smile and apply your blush color back toward the area that you bronzed. This gives the apples of your cheeks a
- beautiful glow. Again, you’ll want to use a sheer shade of blush for this technique. A dark or bright cheek color can be too intense and unnatural-looking.
If you use crème or liquid blush, apply it with either a sponge or your fingers after your foundation and before your powder for easier blending. If you wear your blush without foundation, crème and liquid work better than powder blush as they contain moisture that blends better with the natural moisture of your skin. To apply crème or liquid blush, first dot a little onto the apples of your cheeks and then blend back toward your ears.
With any blush, you should remember the rule to match textures: crème on crème and powder on powder. To increase the staying power of your blush, try these tips:
- Apply crème blush after you apply your foundation.
- Apply your pressed or loose powder.
- Apply powder blush on top of your face powder.
Tips:
If cheek color is too intense, soften it with a dusting of loose powder. Never use blush to contour or shape the face.

Lips
To keep your lips looking luscious, exfoliate them once a week. I always like to use a little lip balm or moisturizer on the lips before I apply the lipstick color, because it helps the lip liner and lipstick go on smoothly and more evenly. Just apply the lip balm first and blot off the excess.Lip pencils will help prevent lipstick from feathering and bleeding, but once you’ve outlined your lips, don’t stop there. Be sure to blend inward so that when your lipstick wears off, you aren’t left with just an outline. You’ll find a brush useful in the application and blending.
Make sure you optimize your entire mouth. Most women don’t, because they tend to draw inside the lip line. Conversely, take care not to overdraw, because if you’re using a lip color that is not natural-looking and you stray too far outside the lip line, it will be noticeable.
BASIC
I’m often asked if women have to wear lip liner. While it’s an optional step, here are three things to consider to help you decide if lip liner is for you:- Lip liner can help define your mouth and reshape your lips if they are uneven.
- Lip liner can help prevent your lip color from bleeding onto your skin.
- Lip liner can help your lipstick last longer, especially if you fill in your lips with liner first before applying your lip color.
APPLICATION:
To properly apply your lip liner to the top lip, begin with a V in the “cupid’s bow” or center curve of the lips. Then starting at the outer corners, draw small, feathery strokes to meet the center V.
On the lower lip, first accentuate the lower curve of the lip, then begin small feather-like strokes from the outer corners moving towards the center.
Now you can actually apply your color. You can use a brush, your fingers, or a tube to apply your lipstick, but if it’s applied with a brush, it will usually look much more precise and last longer. For more intense color, you can apply it straight from the tube, but it will be harder to cover the smaller detailed areas of the lips.
SMALL LIPS
- If you feel you have small lips, there are two ways to create a new, fuller lip look. Here’s the first way:
- First, erase your existing lip line with concealer or foundation. Doing this creates a fresh canvas on which you can design a whole new and improved lip line.
- Using a natural-toned lip pencil, draw a line just slightly above your natural lip line on the top and around the bottom. Don’t exaggerate the line—just slightly above and below your natural lip line is your goal.
- Now, fill in your lips completely with the lip liner, except for the very center of your top lip and bottom lip.
- Next, take a dab of light concealer and place it in the center of your top lip and bottom lip. When you apply your lipstick, this area will remain lighter and help make your lips appear fuller.
- To finish, apply a light, shimmery lip gloss to the center of your lips over your lipstick to help make your lips appear even fuller.

The second way to create fuller lips is by using two complementary shades of lip color—one lighter, one darker. First, line your lips with a natural-toned lip pencil. Then apply the darker shade of lip color on the outer edges of your lips, blending it where it meets the lip liner. Next, apply the lighter shade of lipstick on the inside of your lips and blend it where it meets the darker shade. Finally, take a light, shimmery lip gloss and place it in the center of the lips to create the illusion of fuller lips.
Choosing the correct formula for the desired lip look is important. Glossy is always sexy. The shine makes your lips appear fuller and more youthful. If your lips tend to be dry, stay away from matte lipstick. While the formula wears longer, it can make your lips look and feel even more dehydrated. Crème formulas are always a safe choice, because they tend to work in just about any situation.
Play with lip color. Don’t be afraid of it. It’s always easy to change it. Just remember it’s important to consider your lip size when choosing a lipstick color. Darker shades make the lips look smaller. Lighter shades make the lips look fuller. To review the guidelines for choosing lip color, turn to page 67.
One last point to remember: Never expect lipstick to last all day. Formulas that last that long make the lips look parched and dry. These products contain stains that (unless your lips are freshly exfoliated) will adhere unevenly to the dry areas of your lips, causing your lipstick to appear splotchy and dehydrated.
Tips:
Don’t forget that brighter, warmer colors also make you look younger.
Anything too dark is far too harsh for mature lips.
Remember that paler colors illuminate and make lips appear fuller and more youthful, while dark colors have a minimizing effect, making lips appear smaller.
Always moisturize your lips before applying color.
To help lipstick stay on longer, use lip liner all over your lips. Apply lipstick on top, then blot and reapply.
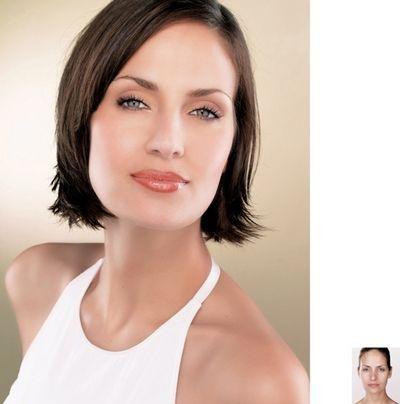
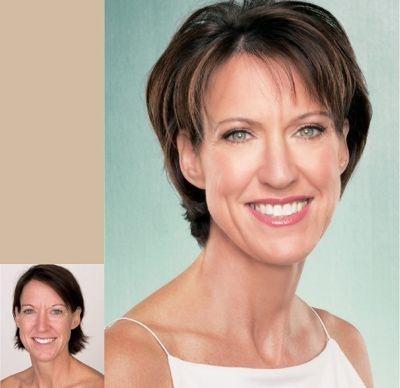
Total Transformations

I have already stated that every woman is beautiful, and in this para I prove it! I have taken women from every walk of life, ethnic background, and age, and shown how beautiful they all truly are. Enjoy seeing the transformations and the tips about how I achieved each look. I am sure that with such a diverse group of women, even you can find someone with a similar look and will be able to take the application tips and use them to make yourself more beautiful. Just remember, makeup is not permanent, so don’t be scared to try new things. If you do not like it when you are finished, you can just wash it off. Have fun and become your most beautiful you!

kerrie bodrato
FACE SHAPE: ovalEYE SHAPE: basic
SHADOWS: Highlight: shimmer flesh Midtone: matte taupe
Contour: shimmer golden brown
OBJECTIVE: To add contrast and color to her face. To open the eyes and create a more defined crease.
APPLICATION: Chose lip and blush colors that were in great contrast to her skin to add color to her face. Defined her eyes really well at the lash line. Made sure to define the crease really well with my midtone so as to deepen it and add shape to her eye and lid.

lana andrews
FACE SHAPE: square EYE SHAPE: deep-setSHADOWS: Highlight: shimmer gold Midtone: matte taupe
Contour: shimmer golden brown
OBJECTIVE: To create the illusion of a more oval-shaped face. To bring her eyes out and push browbone back.
APPLICATION: Contoured the hairline and jaw to soften the “four corners” of the face. Highlighted the center of the forehead, nose, and tip of the chin. Highlighted lid only, to bring the eye forward. Used midtone on browbone to push it away.

gayle kolsrud
FACE SHAPE: square EYE SHAPE: basicSHADOWS: Highlight: shimmer flesh Midtone: matte taupe
Contour: shimmer golden brown
OBJECTIVE: To create the illusion of a more oval-shaped face and to subtly define her features.
APPLICATION: Contoured the hairline and jaw to soften the “four corners” of the face. Highlighted the center of the forehead, nose, and tip of the chin. Highlighted the lid and browbone to open up the eye. Defined the crease and lash line to give the eye more shape.

Pat smith
FACE SHAPE: square EYE SHAPE: basicSHADOWS: Highlight: shimmer gold Midtone: matte mahogany
Contour: matte dark brown
OBJECTIVE: To give the illusion of a more oval-shaped face.
APPLICATION: Contoured the hairline and jaw to soften the “four corners” of the face. Highlighted down the center of the forehead, nose, and tip of the chin. Highlighted the lid and browbone. To create definition at the lash line and in the crease, chose to layer the midtone color rather than a darker color.

tracey allred
FACE SHAPE: pearEYE SHAPE: basic
SHADOWS: Highlight: shimmer flesh Midtone: matte rose
Contour: shimmer golden brown
OBJECTIVE: To create the illusion of a more oval-shaped face. Highlight and open her eyes which are one of her best features.
APPLICATION: Contoured jawline and cheeks to help minimize their width. Highlighted the center of the forehead to create the illusion of more width. Highlighted eyelids and browbones to open the eyes. Defined the crease and lash line.

gloria mayfield-banks
FACE SHAPE: ovalEYE SHAPE: droopy
SHADOWS: Highlight: shimmer gold Midtone: matte mahogany
Contour: matte burgundy
OBJECTIVE: To even out skin tone and brighten areas to add life to the skin. To make the outer corners of the eyes appear to turn up rather than down.
APPLICATION: To even out the skin tone, used multiple shades of foundation then brightened the skin with a golden orange face powder on all highlight areas of the face. Made sure to begin all midtone and contour shadow application in slightly from the outside corner of the eye, making sure to blend up and in, not out and down.

susan porter glassmoyer
FACE SHAPE: oval
EYE SHAPE: hooded
SHADOWS: Highlight: shimmer beige Midtone: matte taupe
Contour: shimmer golden brown
OBJECTIVE: To contour the lid to draw attention to her eyes.
APPLICATION: Layered midtone and contour colors on hooded areas. The layering of color helps the end result appear more subtle and natural.

brooke tobolka
FACE SHAPE: square EYE SHAPE: basicSHADOWS: Highlight: shimmer beige Midtone: matte taupe
Contour: matte dark brown
OBJECTIVE: To create the illusion of a more oval-shaped face.
APPLICATION: Contoured the hairline and jaw to soften the “four corners” of the face. Highlighted down the center of the forehead, nose, and tip of the chin. Brooke has slightly hooded lids, so I applied and blended midtone and contour colors to the area to help it recede. Defined the lash line really well.

arlene lenarz
FACE SHAPE: square EYE SHAPE: wide-setSHADOWS: Highlight: shimmer flesh Midtone: matte taupe
Contour: shimmer golden brown
OBJECTIVE: To give the illusion of a more oval-shaped face and help the eyes appear closer together.
APPLICATION: Contoured the hairline and jaw to soften the ”four corners” of the face. Highlighted down the center of the forehead, nose, and tip of the chin. Layered midtone color in the crease and on the inside hollow of the eye to visually pull the eye placement closer together.

roshawnda r. foster
FACE SHAPE: pearEYE SHAPE: basic
SHADOWS: Highlight: shimmer gold Midtone: matte mahogany
Contour: dark burgundy
OBJECTIVE: To create the illusion of a more oval-shaped face.
APPLICATION: Contoured the temples and defined the hollows of the cheeks to help minimize the width of those areas. Highlighted the chin to create the illusion of width. Highlighted the lid and browbone to open the eye. Used midtone shadow to even out her lids, then defined the lash line really well.

susan t. billy
FACE SHAPE: ovalEYE SHAPE: hooded
SHADOWS: Highlight: shimmer beige Midtone: matte taupe
Contour: shimmer golden brown
OBJECTIVE: To contour the eyelid away to draw attention to the eyes.
APPLICATION: Layered midtone and contour colors on hooded areas. The layering of color helps the end result appear more subtle and natural.

wanda dalby
FACE SHAPE: ovalEYE SHAPE: hooded
SHADOWS: Highlight: shimmer flesh Midtone: matte taupe
Contour: shimmer golden brown
OBJECTIVE: To minimize the hooded area and “open up” the eye.
To give her skin a youthful glow.
APPLICATION: Applied midtone and contour color to the hooded area of the eyelids to help them recede and “open up” the eye. Subtle layering of color creates a very natural effect. Chose a soft warm blush to give her face a warm glow.

mary diamond
FACE SHAPE: round EYE SHAPE: hoodedSHADOWS: Highlight: shimmer flesh
Midtone: matte dark taupe Contour-shimmer golden brown
OBJECTIVE: To give the illusion of a more oval-shaped face. To minimize the hooded area and “open up” the eye.
APPLICATION: Softly sculpted cheeks, jaw, and temples to create a more oval shape. Applied midtone and contour color to the hooded area of the lids to help them recede and “open up” the eye. Subtle layering of color creates a very natural effect. A really well-defined lash line makes the blue in her eyes stand out.

julie baker
FACE SHAPE: square EYE SHAPE: hoodedSHADOWS: Highlight: shimmer beige Midtone: matte taupe
Contour: matte mahogany
OBJECTIVE: To give the illusion of a more oval-shaped face. To minimize the hooded appearance of her eyelids, making her eyes appear more open and alive.
APPLICATION: Contoured the hairline and jaw to soften the “four corners” of the face. Highlighted down the center of the forehead, nose, and tip of the chin. I applied, then blended the midtone and contour colors onto the hooded area to help it appear to recede.

lynda keene
FACE SHAPE: ovalEYE SHAPE: wide-set
SHADOWS: Highlight: shimmer beige Midtone: matte rose
Contour: matte dark brown
OBJECTIVE: To visually bring the eyes closer together and to give her a youthful glow.
APPLICATION: Layered the color in the crease and on the inside hollows of the eyes to visually pull the eye shape closer together. Used warm lip and cheek shades to give her skin a more youthful glow.

maxine allen
FACE SHAPE: ovalEYE SHAPE: droopy
SHADOWS: Highlight: matte sand Midtone: matte caramel
Contour: matte dark brown
OBJECTIVE: To even out skin tone and brighten areas to help add life to the skin. To make the outer corners of the eye appear to turn up rather than down.
APPLICATION: Evened out skin tone by using multiple shades of foundation. Brightened the skin with a golden-orange face powder on all highlighted areas of the face. Applied the midtone and contour shadows slightly in from the outside corners of the eyes to draw attention to the center of the eyelids. Blended shadows well.

jan harris
FACE SHAPE: pearEYE SHAPE: basic
SHADOWS: Highlight: shimmer flesh Midtone: matte taupe
Contour: shimmer golden brown
OBJECTIVE: To give the illusion of a more oval-shaped face. To really define and open up her eyes and make them appear larger.
APPLICATION: Contoured the temples and defined the hollows of the cheeks to help minimize the width of those areas. Highlighted the chin to create the illusion of width. Defined really well with shadow at lash line and by curling her lashes and using multiple layers of mascara. Highlighted lid and inside along bottom lash line to help open her eyes.
nancy castro
FACE SHAPE: square EYE SHAPE: basicSHADOWS: Highlight: shimmer beige Midtone: matte taupe
Contour: matte dark brown
OBJECTIVE: To create the illusion of a more oval-shaped face and to make her eye color “pop.”
APPLICATION: Contoured the hairline and jaw to soften the “four corners” of the face. Highlighted the center of the forehead, nose, and tip of the chin. Highlighted the lid and browbone to open up the eye. Defined the crease and lash line to give the eye more shape and to make eye color “pop.”

dr. fran kaiser
FACE SHAPE: square EYE SHAPE: basicSHADOWS: Highlight: shimmer flesh Midtone: matte taupe
Contour: shimmer golden brown
OBJECTIVE: To create the illusion of a more oval-shaped face and to give her skin a more youthful glow.
APPLICATION: Contoured the hairline and jaw to soften the “four corners” of the face. Highlighted the center of the forehead, nose, and tip of the chin. Highlighted the lid and browbone to open up the eye. Defined the crease and lashline to give the eye more shape. Chose a soft, warm blush to give her face a warm glow.

sonia paez
FACE SHAPE: pearEYE SHAPE: hooded
SHADOWS: Highlight: shimmer gold Midtone: matte dark taupe
Contour: shimmer golden brown
OBJECTIVE: To give the illusion of a more oval-shaped face. To minimize the hooded appearance of her eyelids, making her eyes appear more open.
APPLICATION: Contoured the temples and defined the hollows of the cheeks to help minimize the width of those areas. Highlighted the chin to create the illusion of width. I applied, then blended, the midtone and contour colors onto the hooded area of the eyelids, making them appear to recede.

erica tracy
FACE SHAPE: square EYE SHAPE: basicSHADOWS: Highlight: shimmer beige Midtone: matte taupe
Contour: shimmer golden brown
OBJECTIVE: To give the illusion of a more oval-shaped face.
APPLICATION: Contoured hairline and jaw to soften the “four corners” of the face. Highlighted down the center of the forehead, nose, and tip of the chin. Made sure to highlight the lid and browbone to open the eye. Defined the crease and lash line to give the eye more shape.

joanna hathcock
FACE SHAPE: square EYE SHAPE: basicSHADOWS: Highlight: shimmer beige Midtone: matte taupe
Contour: shimmer golden brown
OBJECTIVE: To create the illusion of a more oval-shaped face.
APPLICATION: Contoured the hairline and jaw to soften the “four corners” of the face. Highlighted down the center of the forehead, nose, and tip of the chin to create an oval illusion. Joanna has very unusually shaped eyes. To accentuate them, I highlighted the lid and brow, then built contour color in the crease and at the lash line.

allison piro
FACE SHAPE: heart EYE SHAPE: basicSHADOWS: Highlight: shimmer flesh Midtone: matte taupe
Contour: shimmer golden brown
OBJECTIVE: To give the illusion of a more oval-shaped face.
APPLICATION: Contoured her temples and the hollows of her cheeks to minimize the width. Highlighted the chin to create the illusion of more width. Made sure to define the lash line really well to intensify the color of the eyes.

kim henry
FACE SHAPE: square EYE SHAPE: basicSHADOWS: Highlight: matte sand Midtone: matte mahogany
Contour: dark burgundy
OBJECTIVE: To even out skin tone and brighten areas to help add life to the skin. To give face a more oval illusion.
APPLICATION: Evened out skin tone by using multiple shades of foundation. Brightened the skin with a golden-orange face powder on all highlighted areas of the face. Contoured the hairline and jaw to soften the “four corners” of the face. Highlighted the center of the forehead, nose, and tip of the chin. Highlighted the lid and browbone to open up the eye. Defined the crease and lash line to give the eye more shape.

patricia young
FACE SHAPE: oval
EYE SHAPE: droopy
SHADOWS: Highlight: shimmer beige Midtone: matte taupe
Contour: shimmer golden brown
OBJECTIVE: To make the outer corners of the eyes appear to turn up rather than down. Give her skin a youthful glow.
APPLICATION: Made sure to begin all midtone and contour shadow application in slightly from the outside corner of the eye, making sure to blend up and in, not out and down. Chose a soft, warm blush to give her face a warm glow.

sarah bird
FACE SHAPE: pearEYE SHAPE: basic
SHADOWS: Highlight: shimmer beige Midtone: matte taupe
Contour: matte dark taupe
OBJECTIVE: To give the illusion of a more oval-shaped face and subtly define her features without making her look too mature.
APPLICATION: Contoured the jawline and cheeks to help minimize their width. Highlighted the forehead to create the illusion of more width. Subtly defined her eyes at the lash line and highlighted her lids and browbones.

ashley cantley
FACE SHAPE: pearEYE SHAPE: basic
SHADOWS: Highlight: shimmer beige Midtone: matte taupe
Contour: shimmer golden brown
OBJECTIVE: To give the illusion of a more oval-shaped face and draw more attention to the eyes.
APPLICATION: Contoured the jawline and the hollows of the cheeks to help minimize their width. Highlighted the center of the forehead to help create width. To help bring attention to the eyes, defined the lash line and the crease really well.

holly jonsson
FACE SHAPE: square EYE SHAPE: basicSHADOWS: Highlight: shimmer flesh Midtone: matte taupe
Contour: matte dark taupe
OBJECTIVE: To give the illusion of a more oval-shaped face. To define her features without the use of a lot of color.
APPLICATION: Contoured the hairline and jaw to soften the “four corners” of the face. Highlighted down the center of the forehead, nose, and the tip of the chin. I wanted a minimal look so I used much more subtle colors to define, therefore giving her a practically no-makeup look.

kathy helou
FACE SHAPE: square EYE SHAPE: hoodedSHADOWS: Highlight: shimmer flesh Midtone: matte taupe
Contour: shimmer golden brown
OBJECTIVE: To give the illusion of a more oval-shaped face. To minimize the hooded appearance of her eyelids making the eyes appear more open and alive.
APPLICATION: Contoured hairline and jaw to soften the ”four corners” of the face. Layered midtone and contour colors on hooded areas of the eyelids. The layering of color helps the end result appear more subtle and natural.

jordan helou
FACE SHAPE: square EYE SHAPE: basicSHADOWS: Highlight: shimmer beige Midtone: matte taupe
Contour: shimmer golden brown
OBJECTIVE: To give the illusion of a more oval-shaped face. To subtly define her features.
APPLICATION: Contoured hairline and jaw to soften the “four corners” of the face. Highlighted down the center of the forehead, nose, and tip of the chin. Highlighted lids and browbones, then defined eyes at lash line and in the crease. Finished with glossy lips.

sidney helou
FACE SHAPE: square EYE SHAPE: basicSHADOWS: Highlight: shimmer beige Midtone: matte taupe
Contour: shimmer golden brown
OBJECTIVE: To give the illusion of a more oval-shaped face. To subtly define her features.
APPLICATION: Her skin was so amazing that I did not have to do much. Contoured hairline and jaw to soften the “four corners” of the face. Highlighted down the center of the forehead, nose, and tip of the chin. Highlighted her lids and browbones. Subtly defined her crease.

braden harris
FACE SHAPE: square EYE SHAPE: hooded
SHADOWS: Highlight: shimmer flesh Midtone: matte taupe
Contour: shimmer golden brown
OBJECTIVE: To give the illusion of a more oval-shaped face. To minimize the hooded appearance of her eyelids making the eyes appear more open and alive.
APPLICATION: Contoured hairline and jaw to soften the ”four corners” of the face. Layered midtone and contour colors on hooded areas of the eyelids. The layering of color helps the end result appear more subtle and natural.

vanessa shasteen
FACE SHAPE: pearEYE SHAPE: basic
SHADOWS: Highlight: shimmer flesh Midtone: matte taupe
Contour: matte dark taupe
OBJECTIVE: To give the illusion of a more oval-shaped face and subtly define her features without making her look too mature.
APPLICATION: Contoured the jawline and cheeks to help minimize their width. Highlighted the center of the forehead to create the illusion of more width. Subtly defined the eyes at the lash line and glossed the lips to give her a fresh, young look.

stacy james
FACE SHAPE: longEYE SHAPE: droopy
SHADOWS: Highlight: shimmer gold Midtone: matte taupe
Contour: shimmer golden brown
OBJECTIVE: To make the outer corners of the eyes appear to turn up rather than down. To give the illusion of a more oval-shaped face.
APPLICATION: Made sure to begin all midtone and contour shadow application in slightly from the outside corner of the eye, making sure to blend up and in, not out and down. Made sure to put lots of color on the apples of the cheeks to visually shorten the length of face.

tess mullen
FACE SHAPE: ovalEYE SHAPE: basic
SHADOWS: Highlight: shimmer beige Midtone: matte taupe
Contour: matte dark taupe
OBJECTIVE: To softly define the features and give her a polished, sophisticated look.
APPLICATION: With an oval-shaped face like Tess’s, there was not a lot to do. Warmed up the skin with bronzer. Subtly defined the eyes by highlighting the lids and browbone, then softly defined the crease and lash line with soft colors.

stefanie cox
FACE SHAPE: square EYE SHAPE: wide-setSHADOWS: Highlight: shimmer beige Midtone: matte taupe
Contour: matte dark brown
OBJECTIVE: To give the illusion of a more oval-shaped face and help the eyes appear closer together.
APPLICATION: Contoured the hairline and jaw to soften the “four corners” of the face. Highlighted down the center of the forehead, nose, and tip of the chin. Layered midtone color in the crease and on the inside hollow of the eyes to visually pull the eye placement closer together.

poppi monroe
FACE SHAPE: square EYE SHAPE: basicSHADOWS: Highlight: shimmer flesh Midtone: matte taupe
Contour: shimmer golden brown
OBJECTIVE: To create the illusion of a more oval-shaped face and to subtly define her features.
APPLICATION: Contoured the hairline and jaw to soften the ”four corners” of the face. Highlighted the center of the forehead, nose, and tip of the chin. Highlighted the lid and browbone to open up the eye. Defined the crease and lash line to give the eye more shape.

julianne
FACE SHAPE: square EYE SHAPE: deep-setSHADOWS: Highlight: shimmer beige Midtone: matte taupe
Contour: shimmer golden brown
OBJECTIVE: To create the illusion of a more oval shaped face. To bring her eyes out and push brow bone back.
APPLICATION: Contoured the hairline and jaw to soften the ”four corners” of the face. Highlighted the center of the forehead, nose, and tip of the chin. Highlighted lid only, to bring the eyes forward. Used midtone on browbone to push it away.

marisol
FACE SHAPE: ovalEYE SHAPE: basic
SHADOWS: Highlight: matte sand Midtone: matte caramel
Contour: matte dark brown
OBJECTIVE: To define eyes and open them up. To give her skin a beautiful glow.
APPLICATION: Made sure to define really well at the lash line and curled her lashes to really bring her eyes out. Applied multiple layers of mascara one to lengthen, one to thicken. Used bronzer to give her skin a rich depth and followed it with a rich warm blush.

pam frank
FACE SHAPE: square EYE SHAPE: hoodedSHADOWS: Highlight: shimmer flesh Midtone: matte taupe
Contour: shimmer golden brown
OBJECTIVE: To give the illusion of a more oval-shaped face. To minimize the hooded appearance of her eyelids, making the eyes appear more open and alive.
APPLICATION: Contoured hairline and jaw to soften the ”four corners” of the face. Highlighted forehead, under eyes on top of cheek bone and tip of chin. Layered midtone and contour colors on hooded areas of the eyelids. The layering of color helps the end result appear more subtle and natural.

patty woodrich
FACE SHAPE: pearEYE SHAPE: hooded
SHADOWS: Highlight: shimmer flesh Midtone: matte taupe
Contour: shimmer golden brown
OBJECTIVE: To create the illusion of a more oval-shaped face and to help her hooded eyelids recede.
APPLICATION: Contoured jawline and cheeks to help minimize their width. Highlighted the center of the forehead to create the illusion of more width. Layered midtone and contour colors on hooded areas. The layering of color helps the end result appear more subtle and natural.

debi moore
FACE SHAPE: ovalEYE SHAPE: deep-set
SHADOWS: Highlight: shimmer beige Midtone: matte taupe
Contour: shimmer golden brown
OBJECTIVE: To bring her eyes out and push browbone back. To give her skin a beautiful glow. Make her lips look fuller.
APPLICATION: Highlighted lids only, to bring the eyes forward. Used midtone on browbone to push it away. Used bronzer on cheeks and temples, ended by choosing a soft warm blush to give her a glow. Used lip enhancing technique to make them appear larger.

lori jones
FACE SHAPE: square EYE SHAPE: basicSHADOWS: Highlight: shimmer gold Midtone: matte mahogany
Contour: matte dark brown
OBJECTIVE: To give the illusion of a more oval-shaped face. To even out and brighten her skin tone.
APPLICATION: Contoured the hairline and jaw to soften the “four corners” of the face. Highlighted down the center of the forehead, nose, and tip of the chin. Highlighted the lid and browbone. To even out the skin tone, used multiple shades of foundation then brightened the skin with a golden-orange face powder on all highlight areas of the face.

elaine moock
FACE SHAPE: square EYE SHAPE: hoodedSHADOWS: Highlight: shimmer flesh Midtone: matte taupe
Contour: shimmer golden brown
OBJECTIVE: To give the illusion of a more oval-shaped face. To minimize the hooded appearance of her eyelids making the eyes appear more open and alive.
APPLICATION: Contoured hairline and jaw to soften the “four corners” of the face. Layered midtone and contour colors on hooded areas of the eyelid. The layering of color helps the end result appear more subtle and natural.
Models need makeup too

I know that everyone thinks that models are perfect, and even though they are pretty darn close to it, even they can benefit from a little makeup. In this chapter, I have taken models that I feel are some of the most beautiful and have shown you that even though they are truly beautiful without makeup, with it they are drop-dead beautiful. (I just think it’s nice to know that even models wake up looking like you!) So enjoy seeing their transformations and know that you are just as beautiful as they are.

fabiana
FACE SHAPE: square EYE SHAPE: basicSHADOWS: Highlight: shimmer beige Midtone: matte taupe
Contour: shimmer golden brown
OBJECTIVE: To give her face the illusion of being a bit more oval. Bring out those beautiful eyes.
APPLICATION: Bronzed and contour the “four corners” of the face. Highlighted the forehead, underneath the eyes on top of the cheek bone, and the chin. Applied deepest shade liberally along lash line to bring out eye color and define.

cynthia
FACE SHAPE: square EYE SHAPE: basicSHADOWS: Highlight: shimmer white gold Midtone: matte mahogany
Contour: shimmer purple
OBJECTIVE: To give the illusion of a more oval-shaped face. To even out skin tone and brighten areas to add life to the face.
APPLICATION: Using multiple shades of foundation, evened out the slight skin discoloration. The main goal was to brighten her face, which was achieved by using a golden orange face powder to highlight areas. Contoured hairline and jaw to soften the “four corners” of the face.

kate
FACE SHAPE: ovalEYE SHAPE: basic
SHADOWS: Highlight: shimmer flesh Midtone: matte taupe
Contour: matte caramel
OBJECTIVE: To draw all the attention to those unbelievable blue eyes.
Give the skin a glow.
APPLICATION: Chose all shades of eyeshadow that had really strong warm undertones so that all the attention would be on the blue in the eyes. Did not have to use dark shadows to define, because the warm undertone really intensified the blue. Applied bronzer to cheeks and temples, giving the skin an amazing glow. Also soft warm lips helped pop the blue in the eyes as well.

nonna
FACE SHAPE: ovalEYE SHAPE: basic
SHADOWS: Highlight: shimmer gold Midtone: matte taupe
Contour: matte dark taupe
OBJECTIVE: To really bring out her eyes and give skin a glow.
APPLICATION: Curled then applied many, many coats of mascara to lashes to really define her eyes without a lot of dark eyeshadow. Made sure to apply mascara vertically and horizontally so her lashes would be thick and long. Used very soft lip color so the attention is drawn to the eyes. Used bronzer on cheeks and temples to give the face a glow.

kate
FACE SHAPE: ovalEYE SHAPE: hooded
SHADOWS: Highlight: shimmer flesh Midtone: matte taupe
Contour: shimmer golden brown
OBJECTIVE: To minimize the hooded appearance of her eyelids, making the eyes appear more open and alive. Give skin a beautiful glow.
APPLICATION: Layered midtone and contour colors on hooded areas of the eyelids. The layering of color helps the end result appear more subtle and natural. Curled lashes really well, helping to open the eyes. Used bronzer on cheeks and temples to give a glow, followed by warm colorful blush.

lauren
FACE SHAPE: square EYE SHAPE: basicSHADOWS: Highlight: shimmer gold Midtone: matte taupe
Contour: shimmer copper
OBJECTIVE: To give her face the illusion of being a bit more oval.
Bring out those beautiful brown eyes.
APPLICATION: Bronzed and contour the “four corners” of the face. Highlighted the forehead, underneath the eyes, on top of the cheek bone, and the chin. Applied deepest shade liberally along lash line to define the shape really well.

alyssa
FACE SHAPE: square EYE SHAPE: basicSHADOWS: Highlight: matte flesh Midtone: matte taupe
Contour: matte brown
OBJECTIVE: To give her face the illusion of being a bit more oval. To give skin color and depth
APPLICATION: Bronzed and contour the “four corners” of the face. Highlighted the forehead, underneath the eyes on top of the cheek bone and the chin. Gave her colorful blush on the apples of her cheeks for more depth and life to skin.

glenna
FACE SHAPE: ovalEYE SHAPE: basic
SHADOWS: Highlight: shimmer flesh Midtone: matte taupe
Contour: shimmer purple
OBJECTIVE: To give her skin some color and a glow. Draw attention to her eyes.
APPLICATION: Warmed up her skin by using one shade darker foundation followed by bronzer on her cheeks and temples, to give her skin more color but look natural. Used lots of color on her eyes to grab attention.

eleanor
FACE SHAPE: ovalEYE SHAPE: hooded
SHADOWS: Highlight: shimmer beige Midtone: matte dark taupe
Contour: shimmer green brown
OBJECTIVE: To minimize the hooded appearance of the eyelids, causing her eyes to appear more open and alive.
APPLICATION: Applied midtone and contour color to the hooded area of the lids to help them recede and open up the eyes. Subtly layered color, starting with one layer of midtone then following with additional layers to help the hooded area appear to recede naturally.

sylvia
FACE SHAPE: round EYE SHAPE: hoodedSHADOWS: Highlight: shimmer beige Midtone: matte taupe
Contour: matte dark brown
OBJECTIVE: To minimize the hooded appearance of the eyelids, causing her eyes to appear more open and alive. To give the illusion of a more oval-shaped face.
APPLICATION: Applied midtone and contour color to the hooded area of the lids to help them recede and open up the eyes. Subtly layered color, starting with one layer of midtone then following with additional layers, to help the hooded area appear to recede naturally. Contoured all along outer edge of face to minimize the width. Highlighted forehead, underneath the eyes, on top of cheek bones, and tip of chin.

carol
FACE SHAPE: square EYE SHAPE: basicSHADOWS: Highlight: shimmer gold Midtone: matte caramel
Contour: shimmer copper
OBJECTIVE: To give the illusion of a more oval-shaped face. To bring out her naturally beautiful skin tone.
APPLICATION: Bronzed and contour the “four corners” of the face. Highlighted the forehead, underneath the eyes, on top of the cheek bone, and the chin. Chose shades of eyeshadow, blush, and lipstick that all work to complement her bronze skin tone, giving her a natural glow.

alischia
FACE SHAPE: square EYE SHAPE: basic
SHADOWS: Highlight: shimmer gold Midtone: matte mahogany
Contour: matte black
OBJECTIVE: To give the illusion of a more oval-shaped face. To even out skin tone and brighten areas to add life to the face.
APPLICATION: Using multiple shades of foundation, evened out the slight skin discoloration. The main goal was to brighten her face, which was achieved by using a golden orange face powder to highlight areas. Contoured hairline and jaw to soften the “four corners” of the face.
After word

Throughout the years, I have been surrounded by beautiful, strong women, all of whom have greatly influenced my ideals of beauty. My training in beauty began with many years of studying art, which I think is why I pay particular attention to the importance of shading, undertones, and blending. My maternal grandfather was a talented artist and painter, so when my mother noticed very early on that I exhibited a similar gift, I was encouraged to begin studying. As early as the sixth grade, I won a scholarship to study painting and sculpture at the Museum of Fine Arts in Houston.
After many years of studying painting, I grew tired of it, so I decided to focus my energy on acting. I then attended a high school for the performing arts and majored in theatre. That’s where my interest in makeup really began, because along with performing in the productions, I was encouraged to do the makeup for them. Actually, it is there that I received my strongest encouragement to pursue my God-given talents in beauty. I then continued my education by studying all aspects of beauty, including hair and skin.
For as long as I can remember, I have always been mesmerized by glamour. Like a lot of people of my generation, from a very early age I considered “Barbie” to be the absolute epitome of beauty and glamour. I have three sisters, and growing up we spent hours playing “Barbie.” As far as I was concerned she had it all—beauty and brains.
Growing up, it was just me and five women. Along with my sisters, there was my mom, who was single, and my grandmother, who was devoted to us. They each had their own style and weren’t afraid to express it. I remember from a very young age begging my mother to grow her hair long and to wear dresses. I guess you could say I was destined for the fashion and beauty business. I remember going (sometimes once a week) with my mother and grandmother to the beauty shop, watching them get their hair done and loving the experience.
One of my fondest childhood memories is of standing watching my grandmother with vast interest as she applied her makeup. Her eyebrows were always a little too dark and slightly crooked. I remember rosy-pink overdone cheeks and frosted, “cotton-candy” pink lipstick. “Nonna” wore her makeup faithfully every single day. In fact, I never saw her go anywhere without it.
Another fond memory is of my mother as she prepared for a date in the very early ‘70s. It was becoming the latest thing to use mascara on the bottom lashes, and I remember sitting watching her and her look of concentration as she carefully applied it for the very first time. When she finished she turned to me and announced she felt that she looked a bit like Raggedy Ann. Of course, I thought she looked fabulous.
Then there were my sisters. Occasionally, as we got older, I was able to practice hair and makeup on them. It didn’t happen that often when we were young, because my mother thought boys should not play with hair or paint faces. I still remember getting my younger sisters (who are twins) ready for their prom. I started with helping them shop for their dresses and finished by doing their hair and makeup for that special night. I guess I have always loved the transformation process.
Since education and knowledge is strength, I can only hope that the information compiled in my book will encourage you, boost your self- confidence, and help you to reveal your true beauty.
As we end our time together, I want to leave you with this thought: Beauty isn’t just about makeup. It’s about self-confidence, individuality, and the desire to embrace your inner beauty. These are the beauty marks that really make you unforgettable. Wear them proudly every day, along with a smile and your own sense of style, and you’ll be absolutely beautiful, inside and out.


self-confidence is the most important element of true beauty.
—robert jones


