Makeup And You SkinTone,Foundation,Concealer,Eye Shadow,Eye Liner,Blush,Lips, Canva Prep,Faces Shapes,Eye Shapes making
Makeup and you
Color choices
In this Article, my goal is to help you make educated choices in selecting your color products. Choosing the correct shade of foundation is extremely important, since the wrong color can ruin the overall look of your makeup (and so can the wrong choice of eyeshadow, blush, or lipstick). Together, we can increase your chances of making the correct choices. Let’s start the education process with a little foundation history.
All through the 1950s and ‘60s—really, until the late 1970s—women were told that it was correct to choose the opposite of their natural skin tone for their foundation color. For example, if your skin had olive undertones, you used a pink-based foundation, and if your undertones were pink, you used an orange- toned foundation.
And then in the 1980s, women were informed that this was all wrong, and they should match their skin’s exact undertone. So if you had pink undertones, your foundation color had to be pink-based. If your undertones were olive, you put on an olive-toned foundation—well, you get the picture.
Then finally in the 1990s, the cosmetic industry discovered that yellow undertones, instead of being undesirable, actually made the skin look the most alive and natural. Yellow is the one color that everyone has in their skin, from the very lightest complexion to the darkest. It’s just that some people have other colors in their skin as well, such as shades of red or brown. Almost everyone looks better with some yellow in their foundation. It counteracts the skin tones you don’t want to see and enhances the tones that you do want to see.
Thankfully now there are more and more innovations in products than ever before, so that with most good-quality foundations, you don’t even know that they are there. They are sheer, yet totally cover and give you flawless-looking skin. It is still absolutely essential that you make the best choice for you so let’s talk about how to make that perfect choice. We already discussed all the different types, now let’s discuss making the right shade choice.
SKIN TONE
Let’s try to make this simple.
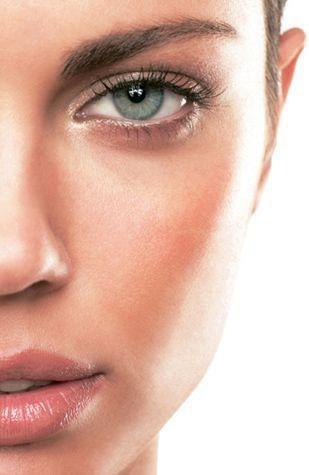
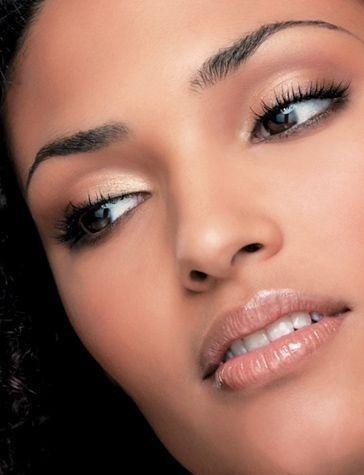
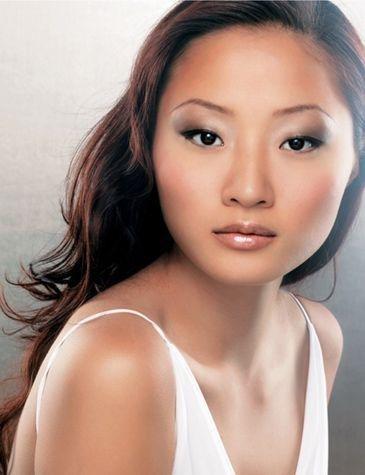
There are approximately fifteen levels of depth to the skin. “Depth” is the lightness or darkness of your skin, with Level 1 being very pale (porcelain) and Level 15 being very dark (ebony). When choosing foundation, there are two factors to consider. First, you want it to match the depth level of your skin —i.e., the lightness or darkness of your skin. Starting on , I have provided photos of eight before-and-after makeovers to show you examples of skin tones, ranging from light to dark. These photos will help you understand the link between the depth level of skin and foundation.
Second, you must match it to the undertone of your skin. The majority of women have “warm” undertones. In my opinion, warmer skin always looks more youthful. A very small number of women have truly “cool” undertones. They have dark hair, pale skin and light eyes. (Think Snow White.) Even if you start out cool, the minute you go out into the sun, you become warm. If you come from certain backgrounds— Italian, Hispanic, Asian, or African-American
—you’re warm. If you have brown or green eyes, you’re warm. If you are able to tan well, you’re definitely warm.
One of the biggest makeup mistakes women make is thinking they have cool undertones when they don’t. That’s why it’s always important to conduct a “stripe test” to make sure you’re wearing the right foundation to match your skin depth level. On page , you’ll learn how to properly conduct a stripe test.

Rhonda shasteen
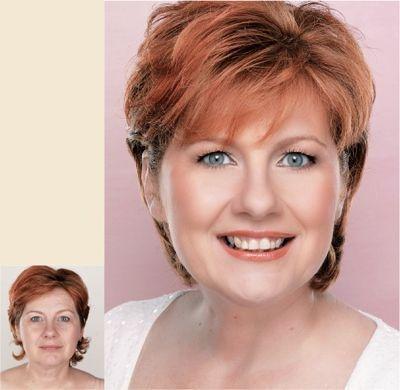
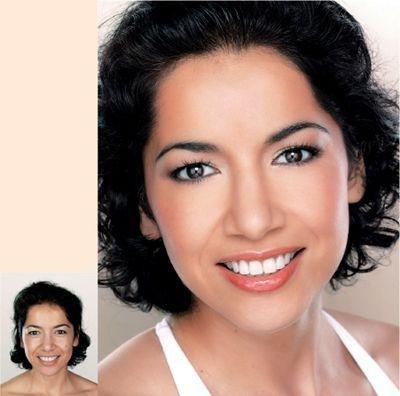
FACE SHAPE: pearEYE SHAPE: close-set
SHADOWS: Highlight: shimmer flesh Midtone: matte taupe
Contour: shimmer golden brown
OBJECTIVE: To give the illusion of a more oval-shaped face. To visually pull the eyes apart.
APPLICATION: Contoured the jawline and cheeks to minimize their width. Highlighted the forehead to create the illusion of more width. Highlighted the inner corner of eyelids to visually push the eyes apart. Defined the outer corners of the eyes with the deepest shadow.
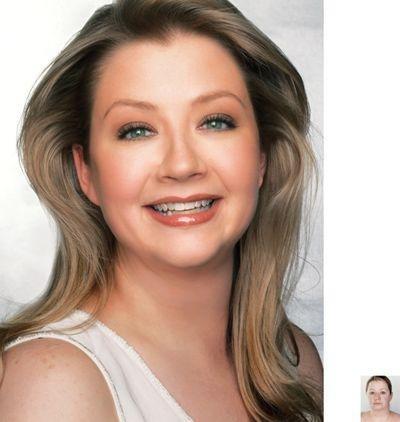
Sherril steinman
FACE SHAPE: pear
EYE SHAPE: hooded
SHADOWS: Highlight: shimmer beige Midtone: matte dark taupe
Contour: matte dark brown
OBJECTIVE: To give the illusion of a more oval-shaped face. To minimize the hooded appearance of the eyelids, making her eyes appear more open.
APPLICATION: Contoured the jawline and cheeks to minimize their width. Highlighted the forehead to create the illusion of more width. Using midtone and contour colors, applied, then blended them to the hooded area, giving the illusion that the area recedes.
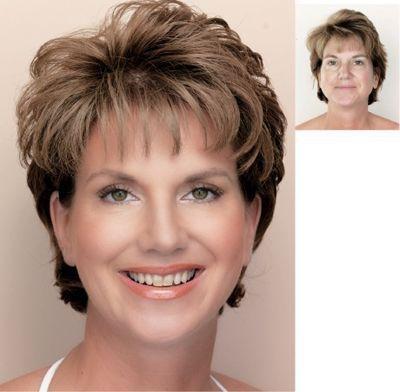
Linda bird
FACE SHAPE: pear
EYE SHAPE: basic
SHADOWS: Highlight: shimmer beige Midtone: matte taupe
Contour: shimmer golden brown
OBJECTIVE: To give the illusion of a more oval-shaped face.
APPLICATION: Contoured the jawline and cheeks to minimize their width. Highlighted forehead to create the illusion of more width. Highlighted the eyelid to brighten the eye, then concentrated on defining the crease and the lash line.
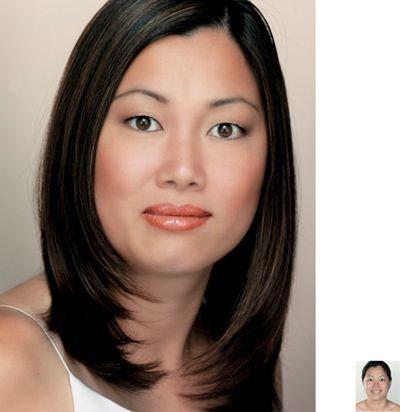
Michelle boye
FACE SHAPE: square EYE SHAPE: wide-set
SHADOWS: Highlight: shimmer beige Midtone: matte dark taupe
Contour: shimmer golden brown
OBJECTIVE: To give the illusion of a more oval-shaped face. To make it appear as if the eyes are closer together.
APPLICATION: Contoured hairline and jawline to soften the “four corners” of the face. Highlighted down the center of the forehead, nose and chin. Applied a darker midtone to the inside hollow of her eyes to visually pull the eye placement closer together.
Eleanor simon
FACE SHAPE: oval
EYE SHAPE: hooded
SHADOWS: Highlight: shimmer beige Midtone: matte dark taupe
Contour: shimmer golden brown
OBJECTIVE: To minimize the hooded appearance of the eyelids, causing her eyes to appear more open and alive.
APPLICATION: Applied midtone and contour color to the hooded area of the lids to help them recede and open up the eyes. Subtly layered color, starting with one layer of midtone, then following with additional layers to help the hooded area appear to recede naturally.
Lydia duron
FACE SHAPE: pear
EYE SHAPE: hooded
SHADOWS: Highlight: shimmer beige Midtone: matte dark taupe
Contour: matte dark brown
OBJECTIVE: To give the illusion of a more oval-shaped face. To minimize the hooded appearance of her eyelids, causing her eyes to look more open and alive.
APPLICATION: Contoured the jawline and cheeks to minimize their width. Highlighted the forehead to help create width. Subtly layered color on the hooded areas of the eyes to help minimize them and open up the eyes.
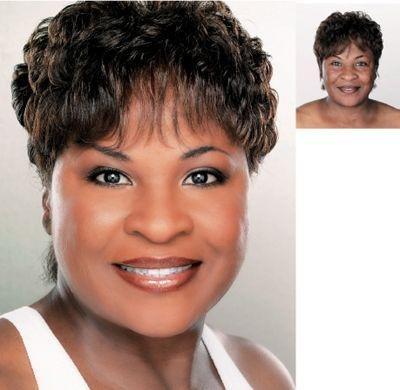
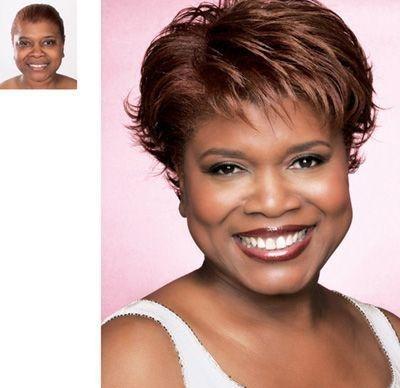
Sonja hunter mason
FACE SHAPE: round EYE SHAPE: wide-set
SHADOWS: Highlight: shimmer gold Midtone: matte mahogany
Contour: dark burgundy
OBJECTIVE: To give the illusion of a more oval shaped face. To even out skin tone and brighten areas to add life to the face.
APPLICATION: Using multiple shades of foundation, evened out skin tone, then highlighted areas with a golden-orange face powder to give life to the skin. Softly sculpted her cheeks, jaw, and temples. Highlighted the lid and contoured the inside hollow of her eyes to visually pull them closer.
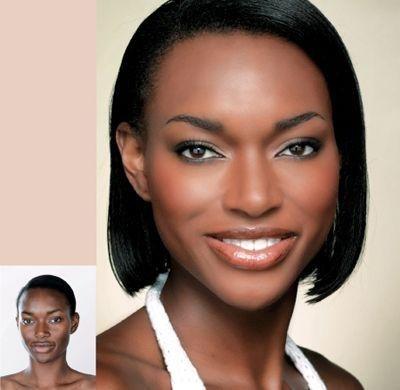
Alischia butler
FACE SHAPE: square EYE SHAPE: basic
SHADOWS: Highlight: shimmer gold Midtone: matte mahogany
Contour: dark burgundy
OBJECTIVE: To give the illusion of a more oval-shaped face. To even out skin tone and brighten areas to add life to the face.
APPLICATION: Using multiple shades of foundation, evened out the slight skin discoloration. The main goal was to brighten her face, which was achieved by using a golden-orange face powder to highlight areas. Contoured hairline and jaw to soften the “four corners” of the face.
Foundation
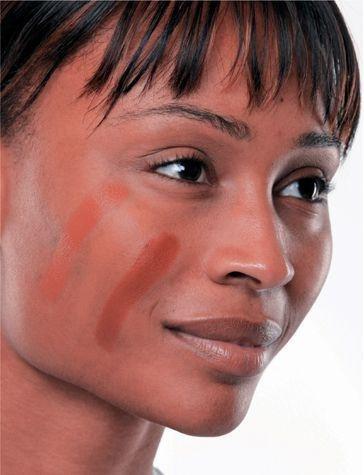
The best way to choose a foundation color is to conduct a stripe test. Here are a few fast rules to follow so you won’t “flunk.” Always conduct your stripe test in natural light. Start with three different foundation shades to compare and contrast. (The area where you will test the shades will vary depending on your skin tone.) Finally, if the shade you choose is the best match with your neck color, you will pass the stripe test with flying colors.
IVORY AND BEIGE
If you have ivory or beige skin tones, conduct the stripe test from jaw to neck to get a true match to the neck. Women with these skin types tend to have redness in their faces, but not in their necks, so it’s important to get a true match. Start by applying three stripes of the different foundation shades from your jaw to your neck and wait a few minutes to see if the oils in your skin change the color pigments. Select the one that most closely matches your neck.
BRONZE AND EBONY
Women with bronze and ebony skin tones should stripe-test from the cheek area to the jaw area, because some women with these skin tones have “facial masking,” or lighter skin on the interior of the face and darker skin on the outer edges of the face. Start by applying three stripes of the different foundation shades extending from your cheek to your jaw area, and wait a few minutes to see if the oils in your skin change the color pigments.
If you have any degree of facial masking, I suggest using my technique of applying two shades of foundation to perfect your skin tone: one shade to brighten your skin, and another to deepen it. Turn to page to find out why two shades are better than one when it comes to facial masking and how to apply them.
CHOOSE YELLOW OVER PINK
As I said before, a shade of yellow foundation complements almost any skin tone. The only time pink is a better choice is if you have pink undertones in your neck as well as your face, which is very rare. Most women with pink in their faces do not have it in their necks. Pink foundation on top of a pink face can become red—and no one wants a red face. Foundations and powders with pink hues actually age the skin and make it appear unnatural, yet many mature women choose pink to give their faces more color. Remember that color should be provided by your blush and lipstick—not by your foundation and powder.
Yellow foundations can actually counteract skin conditions such as rosacea and broken capillaries. Women with these conditions or with ruddy skin tones often feel that yellow foundations look too yellow because they’re used to seeing all the red in their faces. Give it time! Your skin will start to absorb the foundation and work with it better, and your eye will get used to seeing the red neutralized. You’ll soon notice a more even, natural skin tone.
In contrast, many women with yellow in their skin will try to counteract that by choosing a pink foundation. This is never a good choice. You should embrace and enhance the yellow tones in your skin to make it appear younger, more fresh, and alive.
Women with ebony skin should match the undertones in their skin exactly because they are so distinct and noticeable. They can range all the way from golden-orange to true brown. Keep in mind that it is always a good idea to brighten (not lighten) ebony skin. Intense golden-orange tones work well for brightening ebony skin.

Concealer
IVORY AND BEIGE
You can get a lot of mileage out of concealers with yellow undertones. Yellow is the best color choice because it works to counteract most skin imperfections, including the purple of undereye circles, the brown of age spots, and any ruddiness or red in the complexion. The more severe the imperfection— such as a port-wine stain or extremely dark circles—the more yellow you will need in your concealer.
BRONZE AND EBONY
On bronze and ebony skin, a golden-orange concealer for lighter to medium skin tones works wonderfully. For really deep tones of ebony, a warm-brown concealer usually covers best.
Powder
IVORY AND BEIGE
As with foundation and concealer, a face powder with yellow or neutral undertones is usually the best choice. I never recommend using a face powder with pink undertones because it can make the skin appear artificial and older. Your goal should be to find a neutral shade of powder to match your foundation exactly. Or, if you want to warm up your skin or correct imperfections, you should choose a powder with yellow undertones.BRONZE AND EBONY
Women with bronze and ebony skin tones should use a powder with golden-orange undertones to brighten and freshen the skin to a beautiful glow. The darker the skin, the more likely that you should use a powder with warm brown undertones to give the skin a glowing, natural look. Dark bronze and ebony skin tones also should choose a loose powder with a hint of shimmer to it. This will help absorb any oils in the skin and keep it looking fresh and dewy. Loose powders with a matte finish can make bronze and ebony skin appear very flat and ashy.
One more important point about powder: Translucent powder is not invisible (transparent), though the two words are easy to confuse. It is less opaque than other powders, but it is not colorless and can often appear unnatural, especially on dark beige and olive skin tones. It’s always best to choose a powder that is an appropriate match for your skin tone, or one that brightens your skin. The one time translucent powder is helpful is when powdering areas that have been heavily concealed.
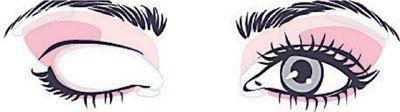
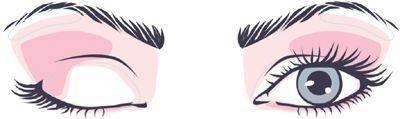
Eyeshadow
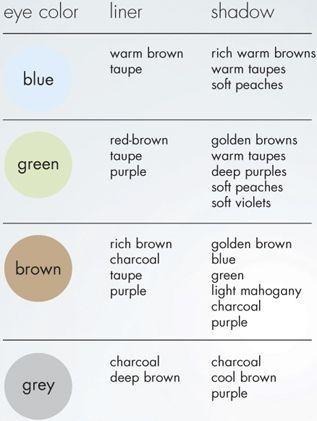
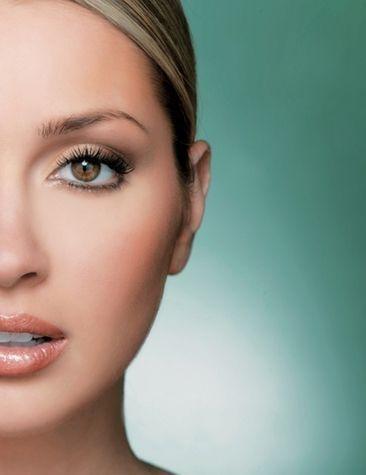
The most important thing to remember about choosing eyeshadow is...YOU! Look at the color of your eyes. Consider your skin tone. Then select a shade that will bring out the natural color of your eyes. Your goal is to make your eye color “pop” or stand out—not compete with, or diminish your natural color in any way.
The chart on the opposite page can help you select shades that will enhance your eyes. Notice there is no blue shade suggested for blue eyes or green shadows for green eyes. The key is to select a color that’s the opposite of your own eye color. For example, the opposite of blue eyes is a warm shade of brown, or tawny, or golden shades.
Brown-eyed girls have it best. They can experiment with a variety of colors and still enhance their natural eye color. So play to your heart’s content with purple, green, gold, or brown. Any color looks beautiful around brown eyes.
If you are wondering why you do not see a category on the chart for hazel eyes, it is because they are not just one color. Hazel eyes are either a mixture of blue and green or green and brown. So depending on which you have you can place them in two different categories. If you have blue and green hazel eyes you can choose shades from the blue or the green category. If you have green and brown hazel eyes you can choose shades from the green category. So it is up to you to decide, don’t be scared to experiment.
Skin tone is another thing to consider. Women with dark ebony skin should not choose an eyeshadow that is too white or light. Likewise, women with fair, pale skin might want to stay away from eyeshadows that are too dark. Subtle, natural colors look better than dramatic contrasting shades—especially during the daytime.
Finally, you do not have to match your eye makeup to your clothing. Makeup is an accessory to you, just like your clothing. Makeup is not an accessory to your clothing. Matching your makeup colors to your clothes can sometimes wash you out and may not always flatter your best features. Choose what looks best on you. Apply your makeup as if you’re wearing white, just like the models in this content. That way your real beauty can shine through and not take a back seat to your clothing or eye makeup.
EYELINER
No matter what your eye color is, choose neutral shades of eyeliner, such as taupe, black, or brown, to shape and define your eyes. Colored eyeliners can help draw attention to your eyes by making the color “pop,” but I recommend saving them for when you want to make a more dramatic makeup statement.
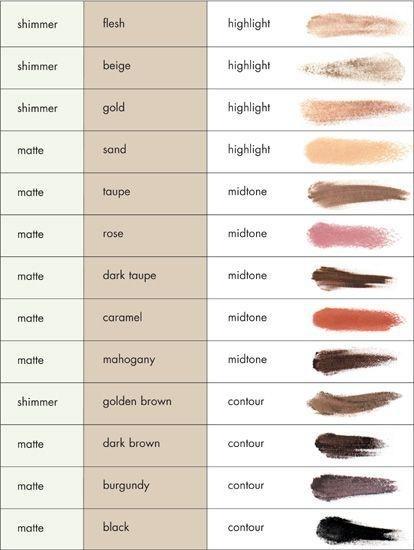
Eyeshadow palette
To show you how simple but versatile makeup can be, I chose a basic eyeshadow palette (shown in the chart on the opposite page) to create every before-and-after look in this book. I believe that, with this palette, any woman can look beautiful, regardless of her eye shape or whether she has an ivory, beige, bronze, or ebony skin tone. Notice that the shades fall into three categories: highlight, midtone, and contour. Using these three depth categories of color helps give shape to your eyelids. To learn more about this simple application technique, turn to page.
Blush
Blush can brighten your face and make it positively glow. The trick is to find a blush color that’s natural and neutral but still brightens and adds life to the skin. The best way to decide what shade to wear is to take a quick jog around the block and see what natural color your cheeks blush.
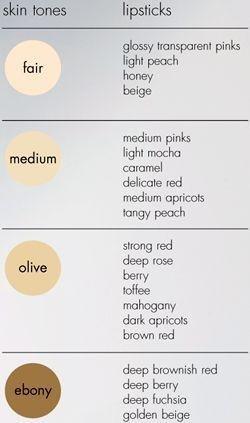
For ivory or light beige skin tones, a blush with soft pink undertones is usually your best choice. As you mature, you may want to switch to a blush with peach undertones instead of pink to help your skin appear brighter and fresher. The color peach is a mature woman’s best friend. It can warm and enhance the skin, while pink often appears ashy and artificial on the skin as it ages.
Women with olive skin tones should use blush with warm undertones that have a richness or intensity so the color shows up on the skin, such as tawny shades of cinnamon or sunny copper. If you have ebony or bronze skin tones, you should also choose a blush with warm undertones, such as apricot or paprika, to give your skin a nice warm glow that appears natural. For a more dramatic look, women with bronze and ebony skin tones can choose a blush with brick red or redbrown undertones for more intense color on the skin. The very best choice for all skin tones is a blush that looks soft and natural and appears to give you a glow from within.

Lips
When it comes to choosing a lip color, size definitely matters. If you have full, beautiful lips, you can wear darker shades as long as they complement your skin tone. Wear lighter shades of lip color on thin lips to make them look fuller. The chart found here can help you find the perfect lip shades for you.Skin tone is very important to consider before choosing a lip color. Women with ivory skin tones should not wear chocolate brown lipstick, for example, because it can age you and appear unnatural— a woman with ivory skin would never have that much brown in her lips. Women with bronze skin tones should not wear pale, frosty lip shades, because they can make lips appear ashy and artificial.
Here are two more things to remember: Dark lip colors age you faster than any other makeup product. And warmer, more colorful lipstick choices always make you appear younger, because they bring out the warm tones in your skin and add life to your face. So lighten up and have fun with your lip color! The beauty of wearing lipstick is that it adds life to your face and makes it appear more healthy and alive.
canvas prep

Getting a flawless finish begins with a few simple tricks up front. From perfectly arched brows to skin that’s been easily prepped for makeup application, you’ll find that it doesn’t take a lot to get results that everyone will see.
Brow attack
Well-groomed eyebrows are a beauty must. You should embrace your natural brow shape, because no matter how much you tweeze, you cannot turn them into something they are not. Some brows naturally curve into a gentle arch; others grow straight across. The only way you can turn a straight brow into a curved one is by tweezing it away completely and drawing in a new one. But do not try this at home—or anywhere else! You’ll find a simple, better way to find the best shape for your brows on the next few pages.

Before we begin, gather your tools together. You will need a pair of tweezers, a brow brush, a small pair of scissors, and a white eye pencil.
Now let’s evaluate your brows.
First, are they too dense? Eyebrows that are too dense can be softened either by trimming them or lightening the color.
To trim them, simply brush them up and snip any stray hairs that extend past the upper brow line. Next, brush them down and snip any unruly hairs that extend past the lower brow line.
Often, brow hairs are actually longer than they appear because the tips of the hairs are light in color and when they reach a certain length they tend to curl. By trimming them, you trim away some of the density and that slight curl so that the hairs lay down more neatly.
It’s important to remember that if you need to trim your brows, it should be done before you start to tweeze. Otherwise you might ruin your brow line by tweezing away hairs that should have stayed but were simply too long.
Are your brows too pale, or are they speckled with gray? If they are, you might choose to have them tinted. Tinting will help define them and alleviate the need for eyebrow makeup.
Now it’s tweeze time.
The best time to tweeze your brows is after a steamy shower. It’s a lot less painful because your pores are already open. Try to tweeze in natural light. You can see what you’re doing much better.
After plucking a couple of hairs from one brow, move to the other, then back and forth a few hairs at a time to preserve the symmetry. Always tweeze in the same direction as the hair grows or the hair might not grow back properly.
A great trick when preparing to tweeze is to use a white eye pencil to sketch a pattern outline (a template of sorts) of the shape you want your brow to be. This is an excellent way to get a preview of the end result before you actually do the tweezing. It’s then a simple matter to remove only the hairs that are covered in white.
Tip:
Take care not to overdo it, because sparse brows, especially on a mature face, make the face look older.You can wax unwanted hairs, but be aware that the hairs may not grow back correctly because wax is pulled off in the opposite direction to the hairs’ growth. Also, a warning: Waxing repeatedly may eventually give a crepe-like appearance to the skin.
HOW DO YOU DETERMINE WHERE TO START?
Here’s how to make the perfect eyebrow take shape. Locate three pivotal points along your brow line by following this quick exercise:Point A. Hold a pencil or the handle of a brush vertically against the side of your nose, noticing where it meets the brow. That is where your brow should begin.
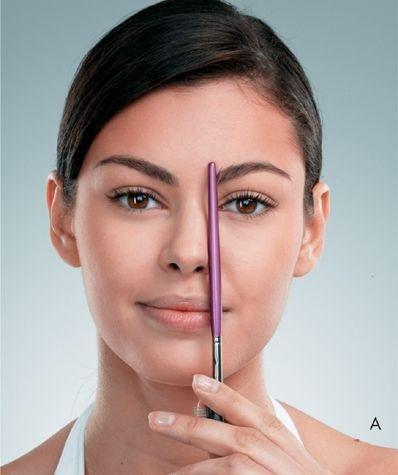
Point B. Hold the pencil against your nostril and move it diagonally across the outer half of the iris of your eye. Notice where the pencil meets the brow. This is the best place for the peak of your arch. If you tweeze from Point A to Point B, tapering the line slightly thinner toward the peak, you will create the ideal shape for your brow.
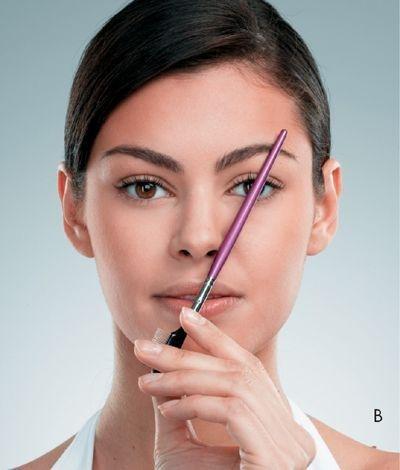
Point C. Again, place the pencil against your nostril and extend it diagonally to the outer corner of your eye. Where it meets the brow is the best place for your brow to end. If you tweeze from Point B to Point C, tapering the line even thinner, you will create the best brow shape for your face.

Moisturizer
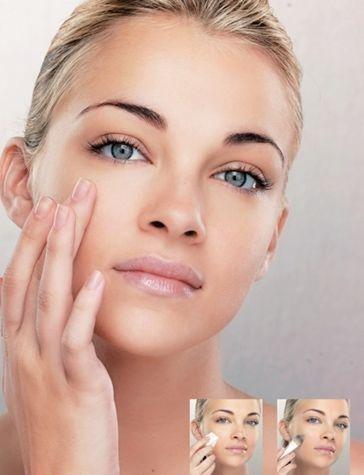
Moisturizing is an important step that helps your foundation go on smoothly and evenly.
Make sure to begin with a freshly washed face, then apply your moisturizer. It’s best applied to a damp face because it goes on more evenly. Moisturizer evens the skin’s porosity and is most effective when it’s left to absorb for a few minutes before you apply your makeup. You can use a light moisturizer or a heavy one; just make sure you choose the right one for your particular skin type.
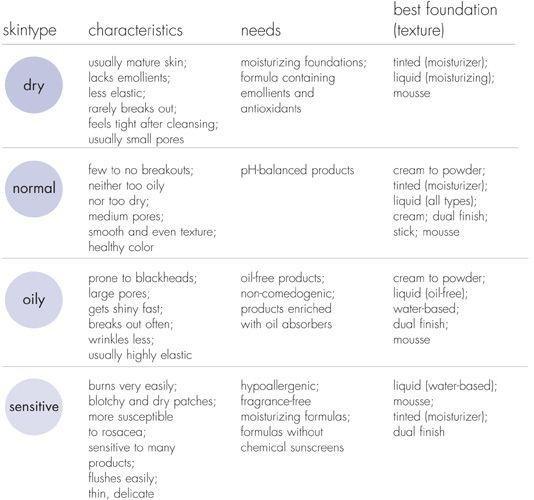
- Moisturizers for normal skin are usually light to help even out any dry areas.
- Moisturizers for dry skin are usually higher in emollients and are richer.
- Moisturizers for sensitive skin are fragrance-and irritant-free.
- Moisturizers for oily skin are extremely light and won’t clog pores. Many have oil-absorbing properties in them that actually help control the oil. Oily skin needs moisturizer, because it can often be over-dried by cleansers. The body is so smart, it actually produces more oil to compensate for the over-dryness, which only makes the complexion appear greasier. A light moisturizer keeps oily skin from producing more oil and can help even out its porosity.
Tip:
Never apply moisturizer to the eyelids before your eyeshadow because it will cause it to crease and not last as long.
Moisturizing your lips before applying lip color will help it go on more smoothly.
Primer
Primer is an optional makeup step that can do wonders for your skin’s appearance. It helps your foundation go on more evenly and makes it last longer. Primer sometimes contains light-reflecting properties that reflect light and help diminish the appearance of some of your small flaws. So it can help your skin appear more perfect and help it stay fresh-looking all day. It also helps prevent your foundation color from altering due to your skin’s natural oils, because it creates a barrier between those natural oils and your foundation. Simply apply it on top of your moisturizer before you apply your foundation.Exfoliate
You should exfoliate your lips regularly to keep your lip texture smooth and soft. A great time to do this is right after you shower. Just apply a generous amount of lip balm and wait a few minutes for it to absorb. Using a soft-bristle toothbrush, brush your lips vigorously then reapply more lip balm. If you prefer, you can use a towel to rub your lips instead of a brush. Whichever method you use, always moisturize when you’re finished. Exfoliating your lips regularly helps your lipstick go on more smoothly and helps your lips appear younger and smoother.
Skin deep

We’ve all heard or even said, “My skin has a mind of its own.” And in a way that’s true. Everyone has a certain skin type with its very own characteristics. Once you know yours, it makes it easier for you to know which foundations are right for your skin type. See how simple it is to find your perfect match?

Applying foundation
Selecting a foundation that’s perfect for you will probably be one of your biggest makeup challenges. That’s why I’m hoping the information I’ve given you so far can help make your selection a little easier. You’ll also want to ask yourself the following questions before you set out to pick your perfect foundation:
What is my skin type?
- What color undertones do I have in my skin?
- How much coverage do I want?
- What type of finish do I want?
The answers should help you make the correct decision. It’s also important to decide what type of finish you want (see below), because some work better on certain skin types than others.
Matte is a great choice for normal/oily skin. It works best on skin with imperfections such as breakouts, scars, and discoloration. It gives you the best coverage and is perfect for oily skin because it contains no oils. However, use a light hand, because if you apply it too heavily, it can appear mask-like.
Dewy works great on dry skin because it adds moisture. It is wonderful for most skin types except oily skin, where it can increase the shine and showcase any flaws such as surface bumps or blemishes. Dewy foundation is not the best choice during summer or in high-humidity areas because it can appear too shiny or greasy instead of just dewy.
Satin works on almost all skin types, with the exception of excessively oily skin. It gives the skin a soft, smooth appearance. The finish is not as flat as matte or as shiny as dewy, but falls in between the two. Satin is the most common
Foundation finish.
Luminous works well on any skin type. Its light-reflecting properties help hide tiny flaws and lines by reflecting light off the surface of the face.When applying foundation you have three basic tools at your disposal.
- A sponge is the most sanitary, because you can wash it or throw it away. Sponges also really help with the blending process.
- A brush blends well, so it gives you great even coverage. It’s also great for touching up the foundation you’ve worn all day. It’s always best to wash a sponge or a brush after every application. The cleaner the tool, the better the application.
- Don’t have a brush or sponge handy? No problem, because the third tool is your fingertips. Just make sure to wash your hands after you’ve applied your moisturizer and treatment products and before you apply your foundation. The residue from the treatment products can compromise the integrity of your foundation and diminish the amount of coverage it provides.
BASIC
It’s best to begin your application on the center of your face, dotting foundation on the cheeks and the forehead, then blending outward. Always remember to finish by blending downward to make sure all the small facial hairs lay flat. After application, blot with a tissue to absorb any oils left from the product. This will really help the staying power of your foundation. Be sure to finish with a light dusting of powder.
Tips:
The best way to achieve a natural look is to first go all over the face with a sheer foundation, then go back and dot your concealer on any small imperfections.
Foundation can also be applied to your lips. It creates a blank canvas for any reshaping you want or need to do. It’s also useful as an anchor for lipstick since it helps it stay on longer.
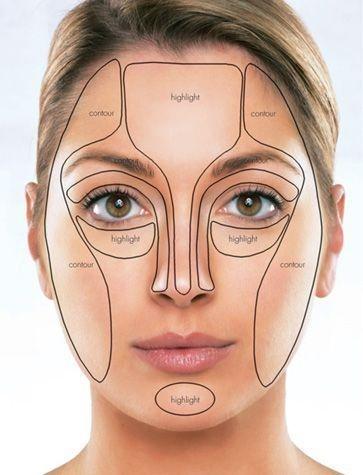
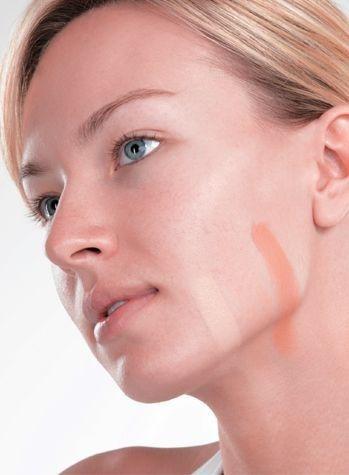
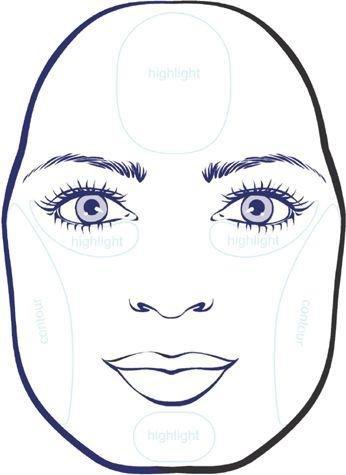
SCULPTING THE FACE
Many women with a full face want to make it appear slimmer. The most effective way to do this is to “sculpt” the face with foundation and powder. These tools can help make any face appear more oval—the face shape that is considered to be the most perfect.
No matter which products you choose, you should follow the same basic “sculpting” method. You will need to select three shades of foundation or powder in three different depth levels.
- The first color should match your skin exactly. It is your true foundation color.
- The second color, your highlight color, should be one level lighter than the first with the same undertone.
- The third shade, your contour color, should be one level darker than your first with the same undertone. There should not be a dramatic difference between the three shades.
The diagram on the left will help you understand the purpose and placement of the three shades. You can also refer to the face-shape diagrams in Chapter 8, starting on page. Be sure to blend the three shades really well, because it is the blending process that makes the sculpting method work.
Step 1. Apply your first or true foundation color all over your face. Then visualize or trace an oval around your face. The width of the oval is your eye sockets; the height and length of your oval extends from the tip of your forehead to the tip of your chin.
Step 2. Apply your second or highlight foundation color to the high points inside the oval, including your forehead, under the eyes, on top of the cheekbones, and the tip of your chin. The features that you highlight will be what the eye will focus on first.

Step 3. Finally, use your contour or darkest shade and apply it to the areas outside the oval, including the temples, along your hairline and the sides of your cheeks. By deepening the outside areas, you are visually helping those areas recede, making your face appear more narrow and oval. If you have ivory or beige skin, you will contour your face more than highlight. On bronze and ebony skin, you will highlight your skin more than contour.
Here’s an easy trick if you want to narrow the width of your nose. Highlight down the center of your nose the width that you want your nose to appear. Then place the contour shade on the sides of your nose, this will make your nose appear narrower because the eye will be drawn to the highlighted area. If your nose is a little crooked, bring a straight line down on the top of your nose with the highlighter shade, then contour along the sides. People will naturally focus on the line, making the nose appear straight.
To complete your sculpted look, you can finish with three shades of powder: one that matches your true foundation shade, one that matches your highlighter shade, and a darker or bronzing powder to match your contour shade. This will give you a beautifully sculpted, three-dimensional effect that should make any face shape appear more oval.
FACIAL MASKING
If your skin has a natural “mask” to it, that is, it has a tendency to be darker around the outer edges of the face and lighter on the interior of the face, you have a condition called facial masking, which sometimes occurs in women with bronze and ebony skin tones. With a little practice, it’s easy to correct facial masking by using the following simple application techniques:
- First, it’s essential to conduct a stripe test across the cheek and the jaw to determine the two foundation shades you will need to create a more even look. (See page for this technique.) It takes two foundation shades to correct your facial masking: one to brighten the darker areas and one to deepen the lighter areas. The goal of your stripe test is to find the two shades that, when applied to the opposite areas of your skin, meet in between and give you a more even skin tone.
- Apply the lightest shade to the darker areas and blend well.
- Apply the darkest shade to the lighter areas and blend well.
- Finish with the face-sculpting technique described on page , using two loose powders— one to match your natural color and one to highlight the “oval” on your face, including your forehead, under the eyes, on top of the cheekbones, and the tip of your chin.

phyllis r. sammons

Concealer
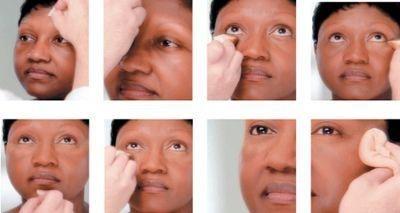
Concealer can improve your skin’s appearance dramatically, but only if it’s invisible. The secret to concealing everything that you do not want to see is applying concealer just to the discolored skin (learning to color within the lines, just like when you learned to color as a child). To cover undereye discoloration (which is really blood vessels that appear blue or gray when they reflect light), you need to choose the perfect shade and texture. If you use a formula that is too moist, it can “travel,” slipping into creases and fine lines, drawing attention to what you don’t want people to notice. A formula that is too dry is bad for the delicate skin around the eyes and can draw attention to those same flaws. You might need to experiment to find the perfect formula for you. You should choose the same shade as your foundation, or a shade or two lighter if you have truly dark undereye circles.If you’re using a concealer that matches your foundation exactly you may apply it either before or after your foundation. But if you’re using one that is lighter, it is best to apply it first.
DARK CIRCLES
First, prepare the area underneath the eye by applying eye crème and letting it soak in for two or three minutes. Blot away any excess with a sponge or tissue. Using eye crème will help your concealer adhere, and if the skin under your eyes tends to be dry, your concealer won’t “cake up” and give you an undesirable appearance. Remember, the undereye area contains fewer oil glands than anywhere else on your body, so it needs plenty of moisture. Be generous with your eye crème, because it’s next to impossible to “over-moisturize” this area. Just be sure to blot off any excess crème after a few minutes to make sure your concealer stays put.Next, take a brush and apply concealer along the line of demarcation—where the discoloration begins on your skin. Extend the concealer up and over the discolored area with the brush. You never want to apply the concealer below the line of demarcation. If you do, you will lighten skin that is already the correct color, and you’ll be back where you started—with two uneven shades of skin. Next, take your finger and, using a stippling motion, pat the concealer along the line of demarcation to blend it in. Be sure to conceal any darkness in the corners of your eyes or eyelids, if necessary.
Serious dark circles call for serious concealer. Use a shade or two lighter than your foundation and apply the concealer before your foundation. When applying your foundation, be sure to stipple or pat it on over the concealed area. You don’t want to wipe away what you initially applied. Yellow concealers are a great choice for covering dark circles on ivory and beige skin. And golden-orange concealers work great for covering dark circles on bronze and ebony skin. Both concealers can counteract all shades of skin discoloration, from red to purple to brown.
Tip:
If you have mature skin, concealer and heavy powder can settle into undereye lines and wrinkles. Since you won’t want to accentuate them with too much powder, use your fingertip to dab on just the tiniest trace
rebecca fisher

UNDEREYE PUFFINESS
As painful as it is to admit this, you cannot improve the appearance of undereye puffiness by swiping a light concealer under the eye area. By now we know that anything we highlight on the face makes it stand out more. Our goal is to disguise the puffy area—not make it more prominent.You can outsmart the puffy area by highlighting the area just underneath it. Because our faces are lit from above, the puffy area creates a shadow on the face. By highlighting the shadowy area, you will bring it out and make the puffiness recede. Because most people look directly at you and not from above, your puffiness will appear even with the rest of your skin. Voilã—you’re flawless!
To apply, take a fine-tipped brush and apply a light-colored concealer just underneath the puffy area. Then lightly blend it with your finger, using a stippling motion. If you have dark circles as well as puffiness, which many women do, you’ll want to use this three-step application:
- Apply concealer to your dark circles first.
- Next, apply your foundation to the rest of your face.
- Finally, highlight underneath the puffiness with your concealer. This is one time that you will apply a lighter concealer after your foundation and not completely blend it away. Be sure to use a stippling motion to blend well.
Tips:
Using a concealer that’s too light will only draw attention to what you’re trying to cover.
Concealer can be made sheerer by mixing it with a little eye crème.
You can test coverage by applying a little concealer to a vein on the inside of your wrist.

madeleine zeisler
Skin imperfections
Let’s face it: Very few women have perfectly flawless skin. Everything from sun damage to genetics can affect the surface of your complexion. Fortunately, there are several different concealers with different textures to help you tackle your problem areas and help your skin look its best.BLEMISHES
To minimize facial blemishes, you’ll want to use a dry-textured concealer so it will cling better to the blemish and not irritate the skin. Apply your foundation first and make sure to choose a concealer that matches your skin exactly. (A light concealer will only make the blemish seem larger.) Using a brush, apply the concealer directly to the blemish. Then take your finger and, using a stippling motion, blend the edges around the blemish into the skin.
BROKEN CAPILLARIES OR VEINS
Here, as always, it’s important to apply concealer only to the areas of discoloration. You can take a brush and actually draw a line of concealer on top of the broken capillary or vein. Then stipple out the edges to blend.ROSACEA
To counteract the redness of rosacea, you should use a yellow-based concealer and apply it only to the reddened areas of your face. Then stipple the outer edges with your fingertips and gently blend into skin. Finish by stippling foundation over the area so it will match your skin tone exactly.
HYPERPIGMENTATION OR MELASMA
Age spots or brown spots can be caused by too much sun or by a shift in hormones during pregnancy. To correct them, you’ll want to apply concealer only to the areas that are discolored. Otherwise, if you extend the concealer past the line of demarcation, you will lighten skin that is already the correct color. After applying, you’ll want to stipple the edges to blend the concealer. Finish by stippling foundation over the area so it will match your skin tone exactly. Women with ivory and beige skin tones should use an intense yellow concealer. If you have bronze or ebony skin tones, you should use a golden-orange concealer.
SCARS
A scar is a raised area of skin that has no pores, which makes it difficult to conceal because pores are what makeup clings to. To conceal a scar, apply a drier-textured concealer with a brush directly onto the scar. Then stipple the edges to blend it in. If you don’t have a dry concealer for scars, try this treatment: Apply moisturizer to the scarred area, followed by a bit of loose powder. The moisturizer gives the powder something to cling to. Then take a brush and apply concealer right onto the scar. The concealer and the powder mix together to form a drier texture that will stick.Remember that concealers are very different from foundations. They are drier, more heavily pigmented, and they “grab” powder differently. If there is an area that you have heavily concealed it is best to use a lighter shade of powder on this area. If you use the same shade of powder as on the rest of your face, the concealed area may appear darker.
For acne scars, which create texture variation, the best way to make the skin look perfectly flawless is to keep it as matte as possible. Loose powder is your best friend, because it will do just that for you. The last thing you will want to do is to try to fill in the “valleys” by applying too much foundation and concealer.
ann brown
Powder
Powder is a makeup must. It sets your foundation, polishes your look, and adds a smooth, velvety softness to the skin. Because loose powder contains more oil absorbers, I prefer to use it to set the foundation, then use pressed powder for touch-ups throughout the day. There are several ways to apply both types of powder:
- A sponge works well for tight areas and is great for “spot” powdering.
- A brush is the easiest and most commonly used tool. It is great for blending, but you must be careful not to over-blend and brush off what you apply. For best results, apply a little bit of powder at a time with a brush, instead of applying it all at once, to ensure smooth, even coverage.
- A powder puff offers the best coverage and is my favorite way to apply powder. Press a puff or sponge into the powder and then “roll” it onto the skin. Pushing it into the skin makes your foundation and powder appear as one with your skin and looks far more natural. To finish, lightly sweep the face with a brush using gentle downward strokes to remove any excess powder.
- A fingertip works well for a light powder application. It’s a great way to powder underneath the eyes, especially for mature women. Just dip your finger in loose powder. Rub your finger in the palm of your hand to brush off the excess, then trace your finger over the area underneath the eyes to set your concealer and help minimize fine lines.
Tips:
Yellow-based shades look healthier and more natural.To get that perfect shade of concealer, try mixing it with a little of your foundation.
Face shape
Everything about your face is unique, including its shape. So why would you want to put on your makeup the same way as everyone else? Here, I’ll show you the different face shapes and teach you how to apply your makeup to enhance the real you.

jamie cruise-vrinios

Oval face
An oval-shaped face is considered by most to be the perfect facial shape because of its beautiful symmetry. It is usually broader at the cheeks, tapering in slightly at both the forehead and the chin. Because of its symmetry, you do not need to contour and highlight your face. You can experiment and play all you want. An oval face can support most makeup trends—so have fun!
carol aaron

Round face
A round-shaped face is fuller and generally holds its youthful appearance longer than the other face shapes. It’s shorter, fairly wide, with full cheeks and a rounded chin.IF YOU HAVE A ROUND-SHAPED FACE:
- Highlight your forehead, underneath the eyes just on top of the cheekbones, and the center of your chin to draw attention to the center of your face.
- Contour your temples, cheeks, and jawline with a bronzer or a product that is one or two levels darker than your skin tone to create the illusion of an oval.

natalie mcguire

Square face
A square-shaped face is the same width at the forehead, the cheeks, and the jaw.
IF YOU HAVE A SQUARE-SHAPED FACE:
- Highlight down the center of your forehead, underneath the eyes just on top of the cheekbones, and the tip of your chin to draw attention to the middle of your face.
- Contour your hairline at the two corners by your temples and the jaw at the two corners.
- Apply blush on the apples of your cheeks to help draw attention away from the corners of the square and help widen the area and make it appear more oval.
kathy peel

Heart-shaped face
The heart-shaped face is wide at the forehead and curves down to a pointed or narrow chin, like an inverted triangle.
IF YOU HAVE A HEART-SHAPED FACE:
- Highlight the chin to help broaden it. Highlight the forehead and underneath the eyes just on top of the cheekbones to draw attention to the center of your face.
- Contour the temples and cheeks to diminish the width of this portion of your face.
Tip:
Pressed powder works well for sculpting the face because it’s low in pigment and blends easily. Or, if you like, you could use a bronzer; just be sure to blend really well.
karen piro
Pear-shaped face
The pear-shaped face is narrow at the temples and forehead and wider at the cheeks and jawline.IF YOU HAVE A PEAR-SHAPED FACE:
- Highlight your forehead to create the illusion of width, and highlight underneath the eyes on top of the cheekbones and the tip of your chin.
- Contour the jawline and the cheeks to minimize their width.
Tip:
Remember that the proper hairstyle can go a long way in balancing any face shape. In this case, bangs and hair brushed over the temples add fullness to the upper half of the face.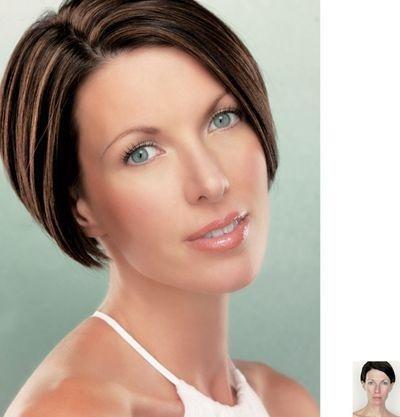
michelle muslin

Long face
The long face has high cheekbones, a high, deep forehead, and a strong, sharp, chiseled jawline.
IF YOU HAVE A LONG FACE:
- Never highlight or contour your face. This will only make your face appear even longer.
- Brush a bit of bronzer across your chin to help shorten its length.
- Be generous with your blush and place a lot of color on the apples of your cheeks. This will help widen and shorten your face.
- Bangs can help shorten the length of your face as well.
Tip:
When applying your blush, start closer in on the apples of the cheeks and brush outward across the face.Eye shape
To master the art of eye color application, it’s helpful to understand how the shape and spacing of your eyes can determine the placement of color and the effect it creates. Together, we’ll look at a variety of different eye shapes and application techniques developed to maximize the individuality and beauty of each. Prepare to see the world of eye color application in a whole new way!
susan freeman
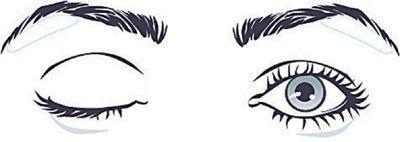
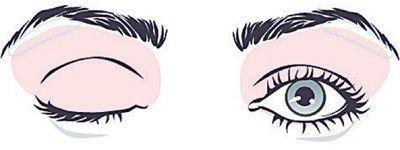
Hooded eyes
Hooded eyes are sometimes called “bedroom eyes” because the lids tend to look partly closed. Applied correctly, eye color can help hooded eyes appear more open by minimizing the eyelid. Our goal is to make the fleshy lid area “push away” or recede, and help your eyes become more prominent than the eyelids.
- Never use a dark eyeshadow over the entire lid, because it makes it appear heavier and will close in your eyes.
- Don’t be tempted to highlight the browbone too much, because doing so can accentuate the hooded appearance of the eyelid.
APPLICATION:
1.Highlight shade: Apply to browbone and along the upper lash line.

2.Midtone shade: Start at the base of your upper lash line and bring the color up and over the entire hooded area. This helps the lid recede. Make sure to blend the areas where the midtone color meets the highlight color.

3.Contour shade: Start at the base of the lash line and bring the color up and over the hooded area. For this eye shape, you need to bring your contour color in a little farther and up a little higher than on other eye shapes. This will help the hooded area recede. Next, sweep the contour color underneath the lower lashes to define the lower lashline. You don’t want to miss this step! Hooded eyes really benefit from a well-defined upper and lower lash line.

Tip:
The eyebrow shape is very important here, because attention can be diverted from the hooded eyelid with a beautifully shaped eyebrow.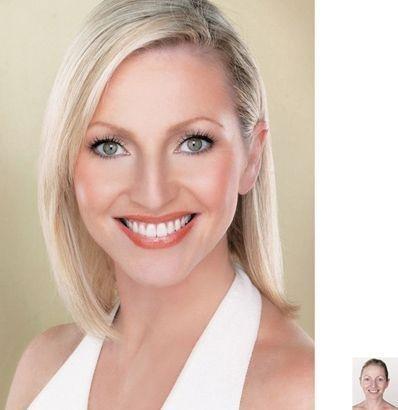
pam shaw
wide-set eyes
If the spacing between your eyes is wider than the width of one eye, your eyes are considered wide-set. Your goal is to create the illusion that they are set closer together.
- In this case, you need to darken the inside hollows of your eye next to the bridge of your nose more than for any other eye shape. Deepening the color helps this area appear to recede and makes your eyes look closer together.
- Begin all dark-color application slightly in from the outer corners and blend your shadow in and up instead of outward, because an outward blending will “pull” the eyes wider apart, and your goal is to “pull” them closer together.
APPLICATION:
1.Highlight shade: Apply to browbone and lid.

2.Midtone shade: Starting from the outer corner of the crease, bring the color towards the inside corner of your eye. Be sure to apply a few more layers to the inside corners to deepen the color and help visually push the eyes closer together.

3.Contour shade: Starting slightly in from the outer corner, brush it across the upper lash line and up into the crease of your eye. Also sweep it underneath the lower lash line, being careful not to extend the color beyond the outer edge of the eye.
missy brumley
Prominent eyes
If your eyelids and eyes are very full and tend to extend from the face, you have prominent eyes. The goal here is to visually “push” the eye away from us and help it appear to recede more gently into the face. We do this by creating a light-to-dark effect with the three eyeshadows, with the darkest shade applied closest to the lash line and fading as you go toward the brow.
- Never highlight the eyelid, or you will make the eye appear even more prominent.
- A deeper or contour shade across the lid helps to minimize it and makes it appear to recede.
APPLICATION:
1.Highlight shade: Apply to browbone only.
2.Midtone shade: Start at the base of your upper lash line and bring the color up and over your entire lid, all the way up to your browbone.
3.Contour shade: Again, start at the base of your lash line, and bring the color all the way across the lid and up into the crease. Then sweep the contour color underneath the lower lash line as well.

judie mccoy
Deep-set eyes
Deep-set eyes are eyes that are set deep into the sockets. The browbone also extends out farther than with any other eye shape. The goal with deep-set eyes is to bring them out and make them more noticeable.
- A dark eyelid does not work with this eye shape. You want to highlight deep- set eyes as much as possible to help bring them out.
- A dark crease is also unnecessary for this eye shape. Nature has provided its own, so there’s no need to emphasize it.
- There is no need to highlight the browbone, since it is already prominent.
- If you wear eyeliner with this eye shape, keep it very close to the lash line and very thin. A thick eyeliner will work against you when you’re trying to bring the eye out, especially on the upper lid.
APPLICATION:
1.Highlight shade: Apply to the eyelid and in the crease.

2.Midtone shade: Bring the color up above the crease and sweep it across the browbone to help visually “push” the browbone away from us.

3.Contour shade: Apply to the outer corner of the upper lash line, then up onto the corner of the browbone to help “push” the area away, or recede. Sweep the contour shade underneath the lower lash line for definition.

Tips:
Never darken your lid, because it can close in your eyes and make them appear smaller.
For drama, I always use a brighter (not necessarily a darker) color of shadow.

taylor moore
Close-set eyes
The average space between a pair of eyes is approximately the width of one eye. If your eyes are spaced any closer, you have close-set eyes. Your goal is to create the illusion of eyes that are farther apart.
- Keep the inside corners and areas closest to the nose as light as possible to help visually “push” the eyes apart.
- Make sure to concentrate the darker shades on the outer corners of this eye shape.
APPLICATION:
1.Highlight shade: Apply to lid and browbone. Also apply to the inside corner at the bottom lashline.

2.Midtone shade: Starting at the outer corner of the crease, bring the color in toward the inside corner to the brow but not all the way over to your nose.
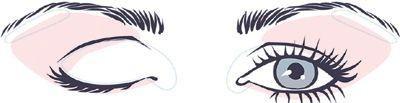
3.Contour shade: Sweep it across the base of the upper lash line and up into the outer area of the crease. Sweep it underneath the lower lash line for definition, except for the inside corners. Apply your highlight shade to the inside corners of the eye to help your eyes appear farther apart.

Tip:
To open up your eyes and create the illusion of larger eyes, you can apply white or beige eyeliner around the inside “wet tissue” of the eyes (the inside rim).
lisa madson
Droopy eyes
Droopy eyes slope downward at the outer corners. They are sometimes referred to as “sad puppy-dog eyes.” Your goal is to make the outer corners appear as if they turn up rather than down.
- You can do this best by creating an “open-ended” eye, which means you do not extend your colors to the outer corner of the eye where it begins to turn down. By leaving it natural, you actually create a visual “lift” to the eye.
- When applying mascara, be sure to concentrate on the middle to inside lashes. Defined lashes on the outer corner of the eye will only accentuate the droopiness.
- Make sure your eyebrows curve gently outward—never in an exaggerated downward arch.
APPLICATION:
1.Highlight shade: Apply to browbone and lid.

2.Midtone shade: Starting slightly in from the outside corner, bring the color across the crease into the inside corner of the crease.
3.Contour shade: Starting just slightly in from the outside corner, bring your color up and into the crease. Next, sweep contour color along the lower lash line, making sure once again to start slightly in from the outside corner.